How to Measure a Roof with Google Earth: Step-by-Step Guide
By Jack Gray, Roof Online Editor • Updated November 16, 2023
If you just want to see a satellite image of your roof, check out our article How to See a Satellite Image of Your House. It’s a little less complicated.
Table of Contents
- Introduction
- Some Notes Before We Start
- Measuring Roofs with Satellite Imagery
- Can Google Earth Really Measure My Roof?
- 1. Download and Install Google Earth
- 2. Open Google Earth
- 3. Uncheck “3D Buildings” Box
- 4. Search for the Address of the Building
- 5. Zoom in on the Roof
- 6. Center the Roof
- 7. Rotate the Roof
- 8. Reset the Viewing Angle
- 9. Select Your Measuring Tools
- 10. Move the Box out of the Viewing Field
- 11. Measure a Roof: Pick Your First Roof Corner
- 12. Move to the Next Corner
- 13. Move to the Third Corner
- 14. Finish Clicking on All the Roof Corners
- 15. Did You Click on the Wrong Spot?
- 16. A Couple of Notes on Adjusting Your Lines
- 17. Find the Area of the Roof
- 18. Done!
Introduction
I’ve been calculating roof areas for real roofs for over 20 years now. An accurate accounting of total roof area is pretty important when you bill your clients based on roof square footage. (We bill roof maintenance programs and roof condition assessments based on the size of the roof.)
Before Google Earth came out, measuring roof areas was a real pain. You had to get up on the roof with a measuring wheel and graph paper, and spend hours up there.
Google Earth was a fantastic addition to my toolkit and I’ve been using it to measure roofs since 2006 (back when you had to pay for the Pro Version), so I’ve gotten pretty good with it.
This article explains the basics.
Some Notes Before We Start
No, You Can’t See a Satellite View of Your Roof in Real Time
If you’re here wondering if you can see a real-time satellite image of your roof, the answer is “no, you can’t”. To do that, you would have to be able take control of the camera on a satellite, point it at your house and zoom in.
Nobody on Earth has the capacity to let millions of random users control a camera on a satellite at the same time, which is what would be necessary for that.
And they certainly wouldn’t let anyone use a satellite-based camera for free.
Google Earth works by compiling a massive database of satellite images which they combine to create a seamless collage that covers almost the entire globe in amazing detail. But the images they use are typically anywhere from a few weeks to a few years old.
There is currently no official guidance from Google about the average age of the images used in Google Earth, but there are a lot of websites claiming the average image is 1 to 3 years old. I believe they all got that figure from an old post on the Google Earth blog that has since been deleted.
Anyway, if you’re going to measure a roof using satellite images, you should try to be sure the roof hasn’t been altered recently.
Satellite Measurements: Flat Roofs vs. Pitched Roofs
Keep in mind that for measuring roof areas, this measuring technique is only usefully accurate for low-slope or “flat” roofs. Satellite images cannot account for the extra surface area that a pitched roof has compared to a flat roof with the same footprint area.
Satellites look almost straight down at the roof. They can’t tell if the roof is rising at a steep angle. A very steep pitched roof can have up to twice the surface area of a flat roof that covers the same amount of ground.
And satellite images will not help you find the pitch of a roof.
If you want to measure the area of a pitched roof, please see How to Find the Area of a Sloped Roof.
And even “flat” roofs usually have a little bit of a slope, so you might want to use one of the very low roof pitch multipliers once you have your area figured out.
Measuring Roofs with Satellite Imagery
Measuring a roof can be a daunting task, especially when it comes to larger buildings. Fortunately, technology has advanced to the point where measuring a roof is now easier than ever before.
Satellite imagery can be used to measure a roof to a useful degree of accuracy and provide detailed measurements of the various roof sections and many rooftop features. In this article, we’ll walk you through how to measure a roof using Google Earth.
We will also look at some of the tools available in Google Earth that you can use for measuring roofs and how they can help you get accurate results quickly and easily.
Can Google Earth Really Measure My Roof?
The simple answer is yes, Google Earth can measure your roof if you know how to use it. With the Google Earth app, you can measure a roof in several ways. You can draw a line around the perimeter of your roof or any rooftop structure or equipment to get a usefully accurate (but not exact) measurement.
You can also use the “ruler” tool to measure distances between two points as well as angles and areas. This makes it easy to calculate the size of your roof and get a rough estimate for materials and other costs for any potential work.
To help you maximize accuracy, the Google Earth Pro version allows you to add a ground-level offset to your measurements, resulting in more precise results when you use it to measure a roof.
Click on the images to enlarge them.
1. Download and Install Google Earth
The first thing you need to do before you can measure a roof with Google Earth…is download and install Google Earth Pro.
Google Earth Pro used to be the paid version of Google Earth (it used to cost $400 per year about ten years ago), but it’s free now.
It includes tools that weren’t available on basic Google Earth, the most relevant tool in this case being a measuring tool that allows you to measure the area of a polygon.
You can download it at: https://www.google.com/earth/versions/
2. Open Google Earth
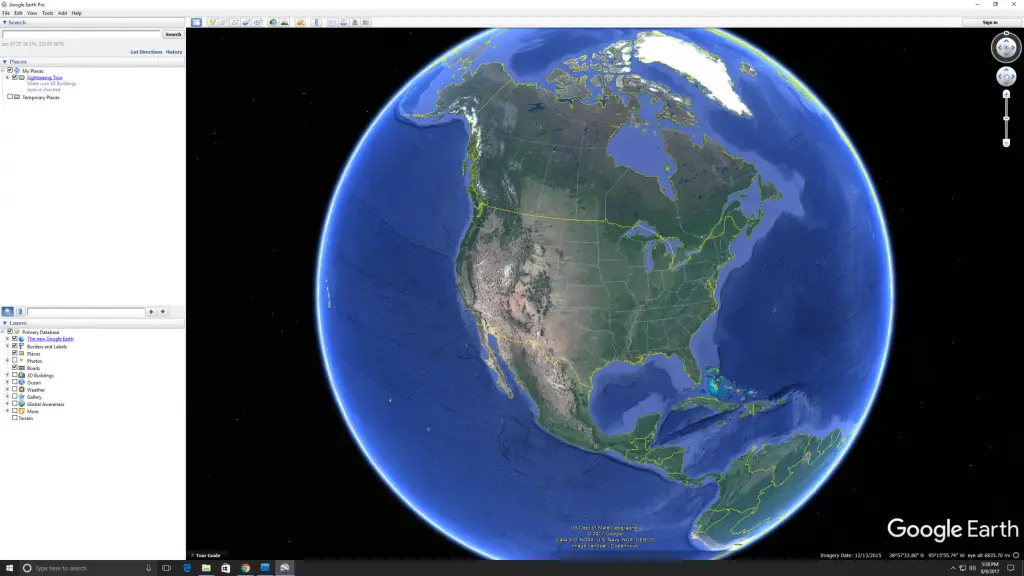
Once you’ve installed Google Earth Pro, open it. You’ll see an image of the Earth along with various menus and tools around the edge of the screen:
3. Uncheck “3D Buildings” Box
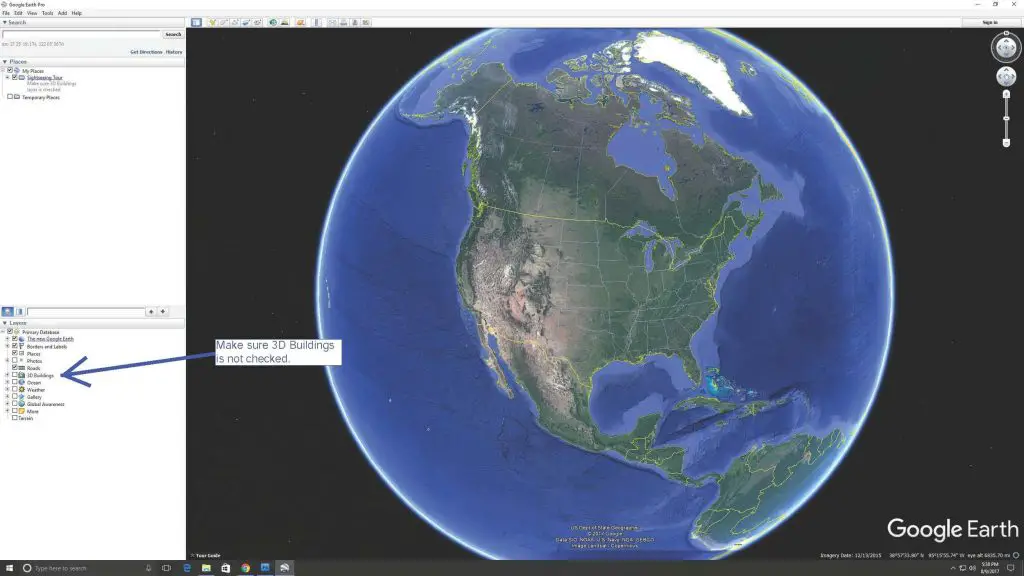
Make sure the box for “3D Buildings” is NOT checked. When you’re trying to measure a roof in Google Earth, having the 3D Buildings mode turned on can interfere with your measurements.
The 3D Buildings option is located under the “Layers” menu on the bottom of the right side of your screen:
4. Search for the Address of the Building
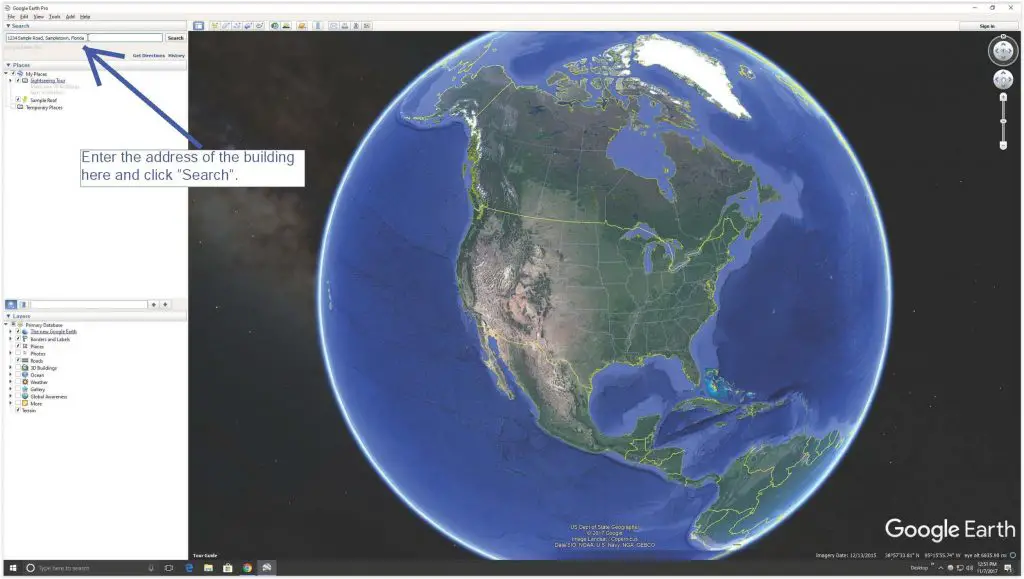
At the top left of the screen, you’ll see a search field. Enter the address of the building you want to measure in the search field and click on “Search”:
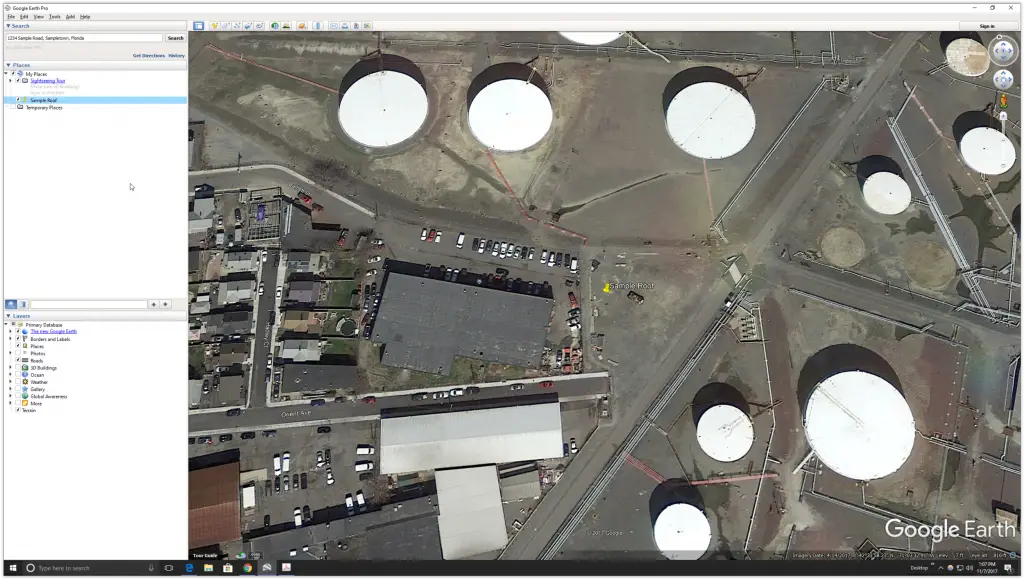
This will put a pin on the address location and the image field will zoom to the location and center itself on the pin so that you can see the roof you want to measure:
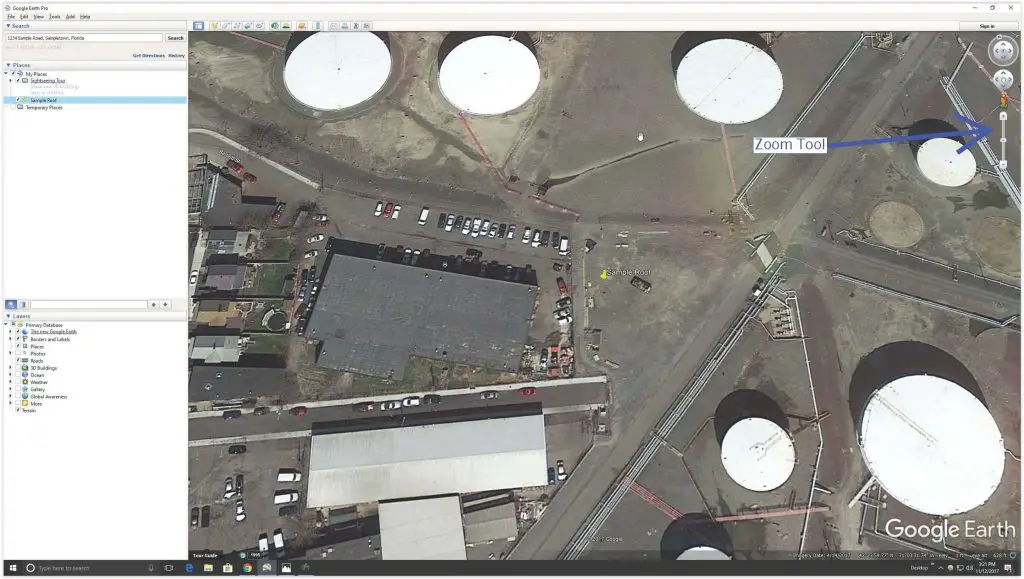
5. Zoom in on the Roof
The “eye altitude” (shown at the bottom right) at this point is still at quite a distance. In order to measure a roof and get the most accurate results, you need to zoom in so that the roof fills as much of the image field as possible.
There are two ways to zoom in: you can use the slider in the top right corner of the image field, or you can scroll with your mouse wheel. (Make sure the cursor is within the image field to scroll.)
6. Center the Roof
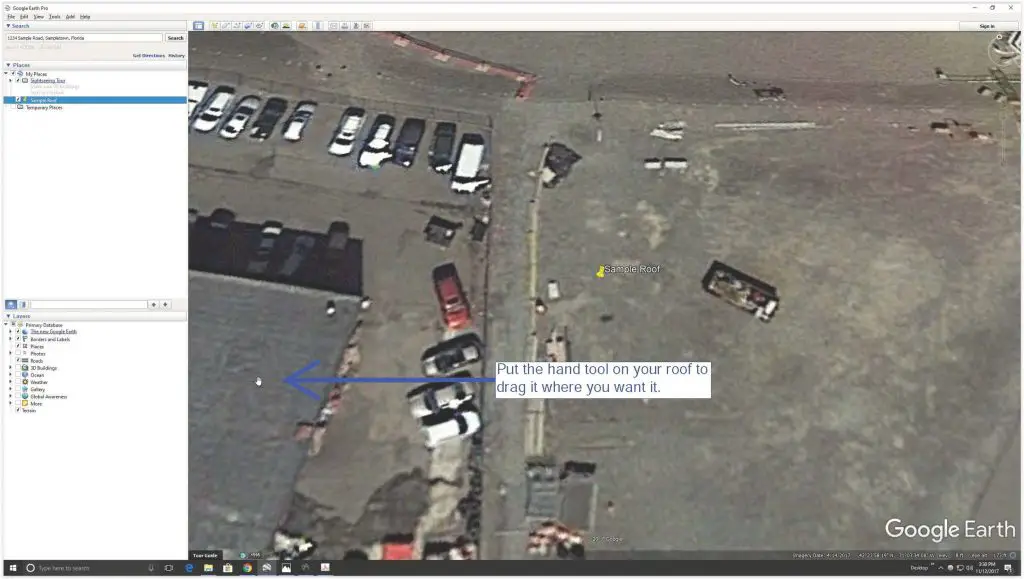
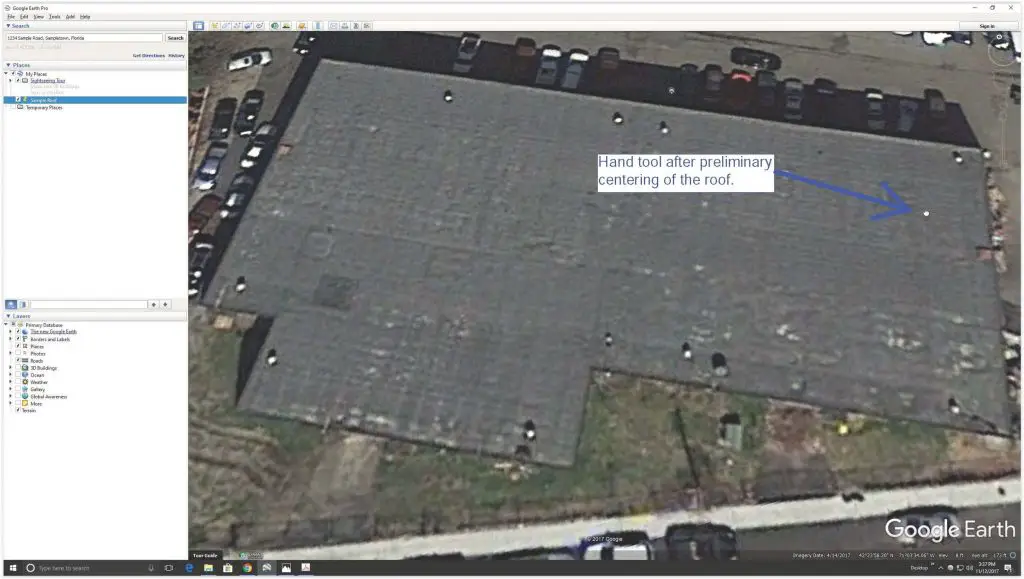
In order to measure a roof in Google Earth, you need to have the entire roof visible and centered in the Google Earth image field.
To make sure the image field stays centered on your roof, put the cursor (looks like a little hand) on your roof and hold down your left mouse button. This lets you drag the roof to the center of the image field:
7. Rotate the Roof
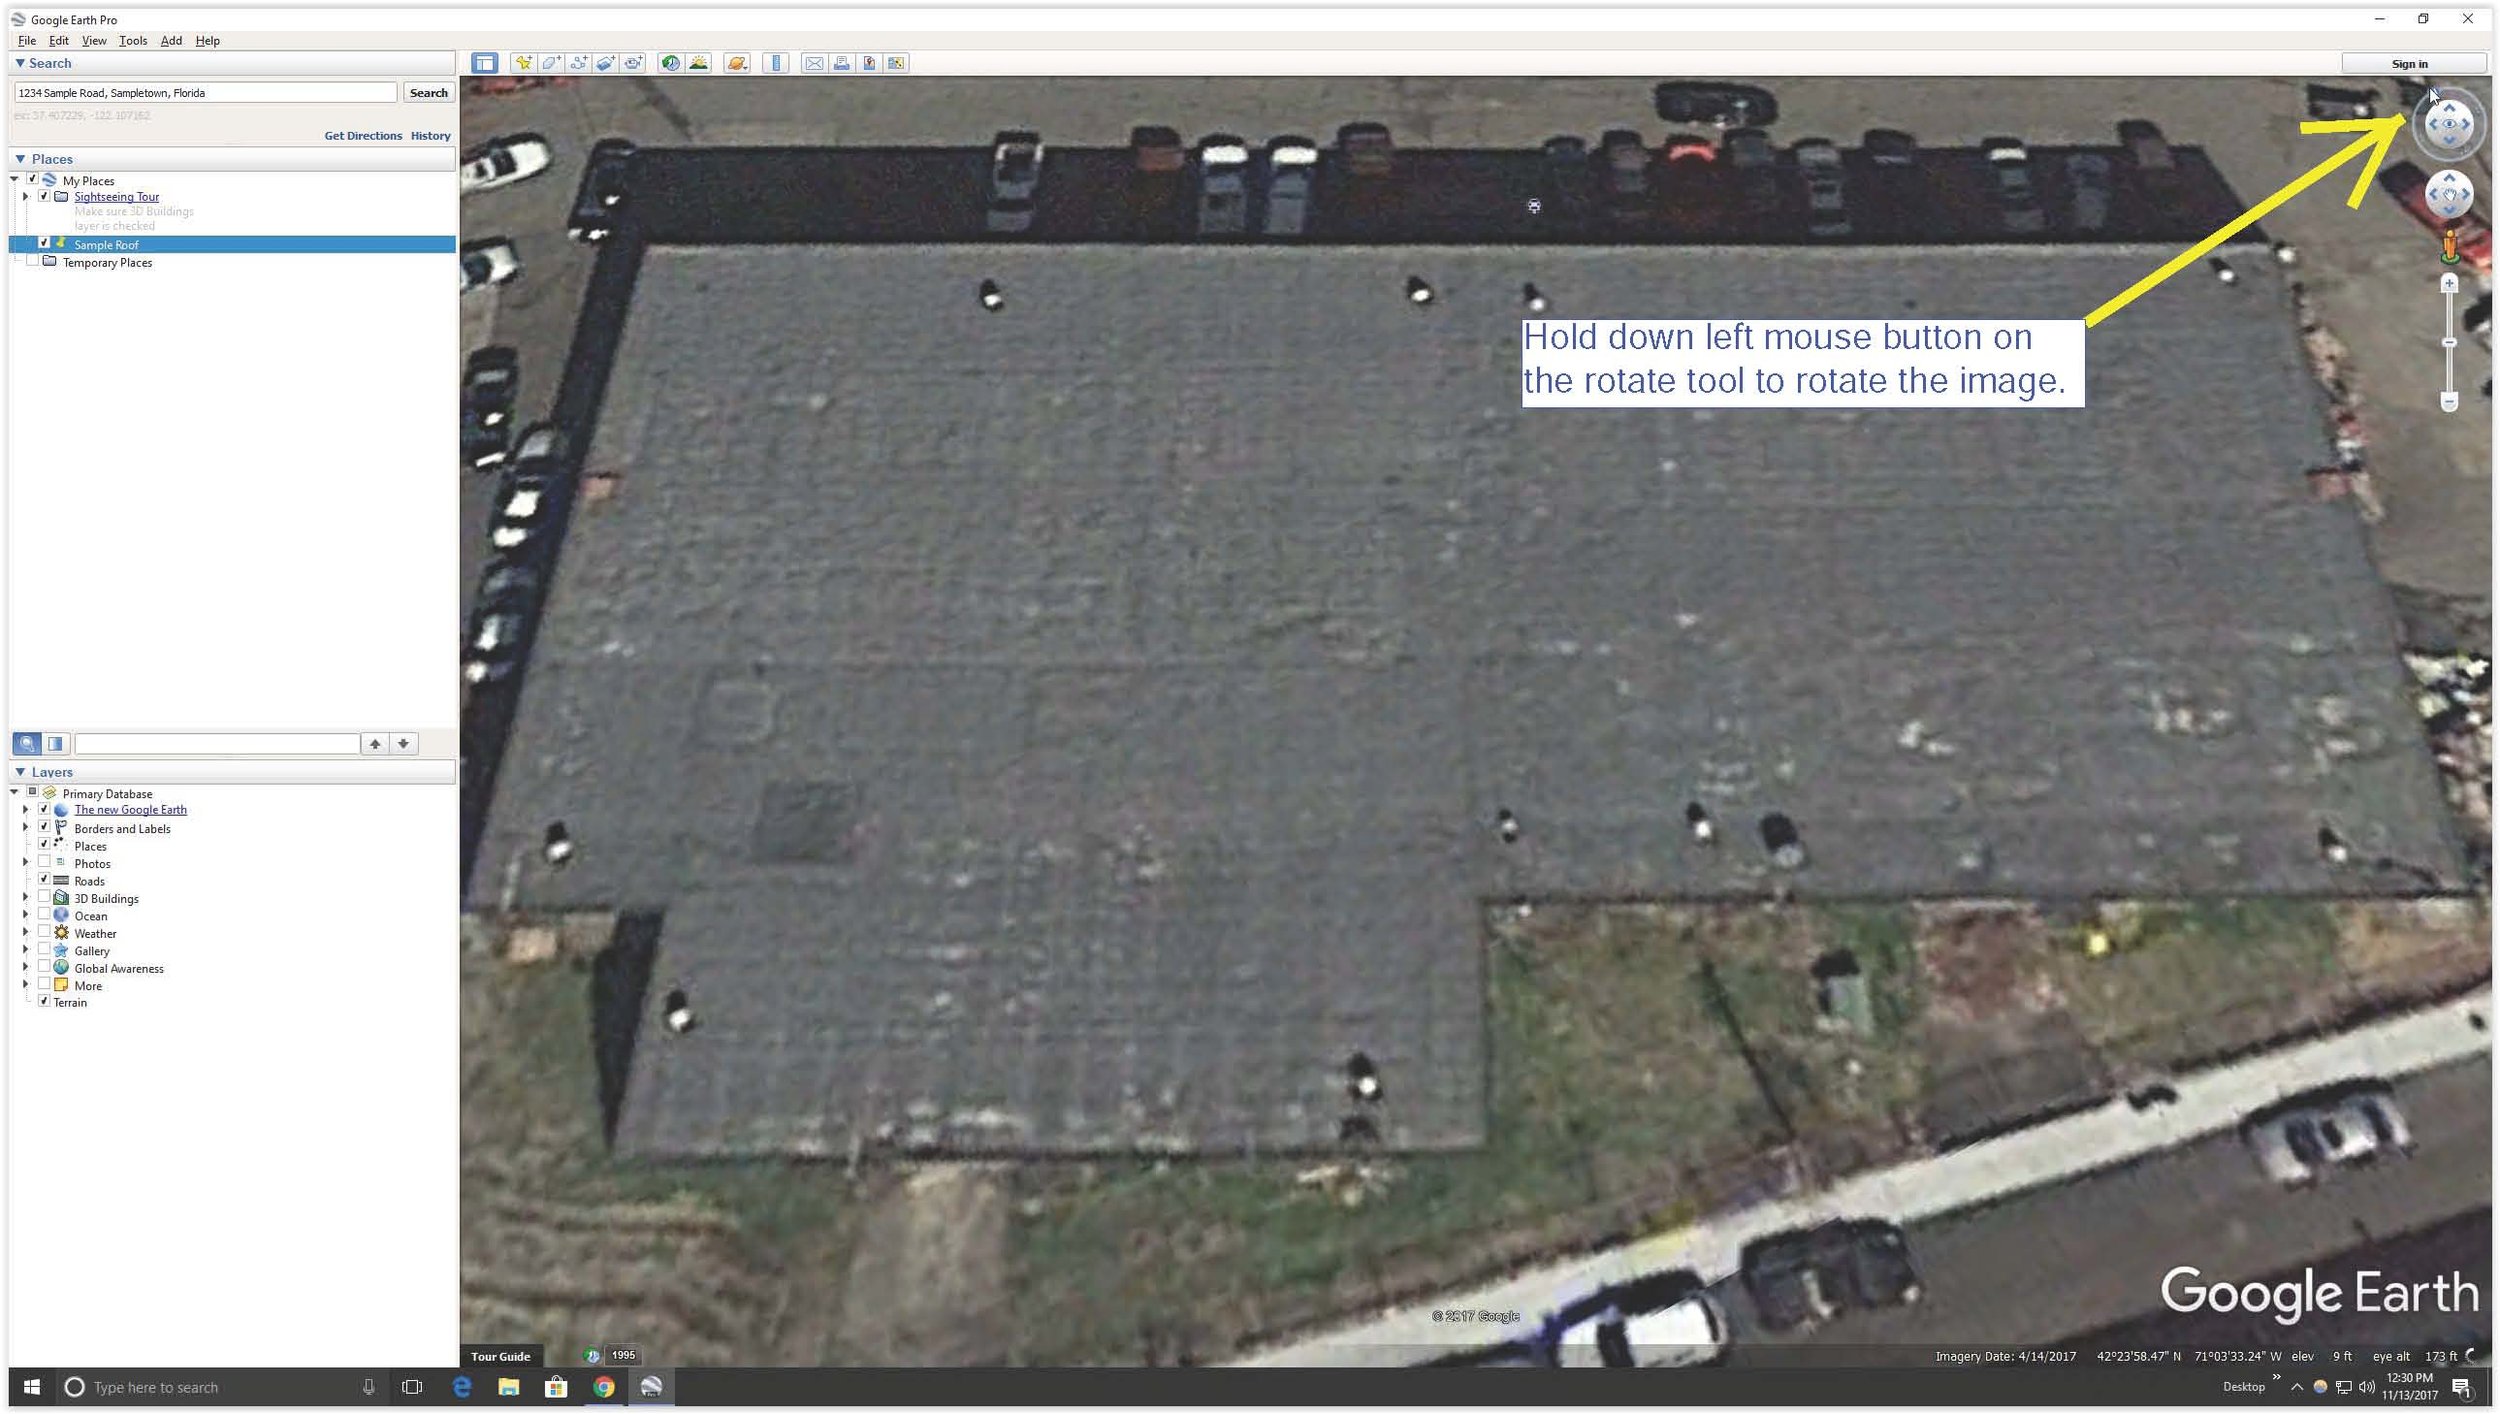
You want the roof to fill up as much of the image field as possible, as this makes it easier to measure the roof and makes your measurements more accurate. Start by rotating the roof using the rotate tool in the top right corner of the image field.
Put the cursor on the “N”, hold down the left mouse button, and move the “N” around the little circle to rotate the image.
It usually works out best if you line up the longest edge of the roof so that it’s parallel with the top edge of the image field.
Note: The rotate tool might not appear in the top right corner of the image field for you at first. If this is the case, in the menu bar on the top left, click on “View”, then click “Show Navigation”, then check the box for “Automatically”.
8. Reset the Viewing Angle
Keep rotating, zooming, and centering the image until you’re satisfied.
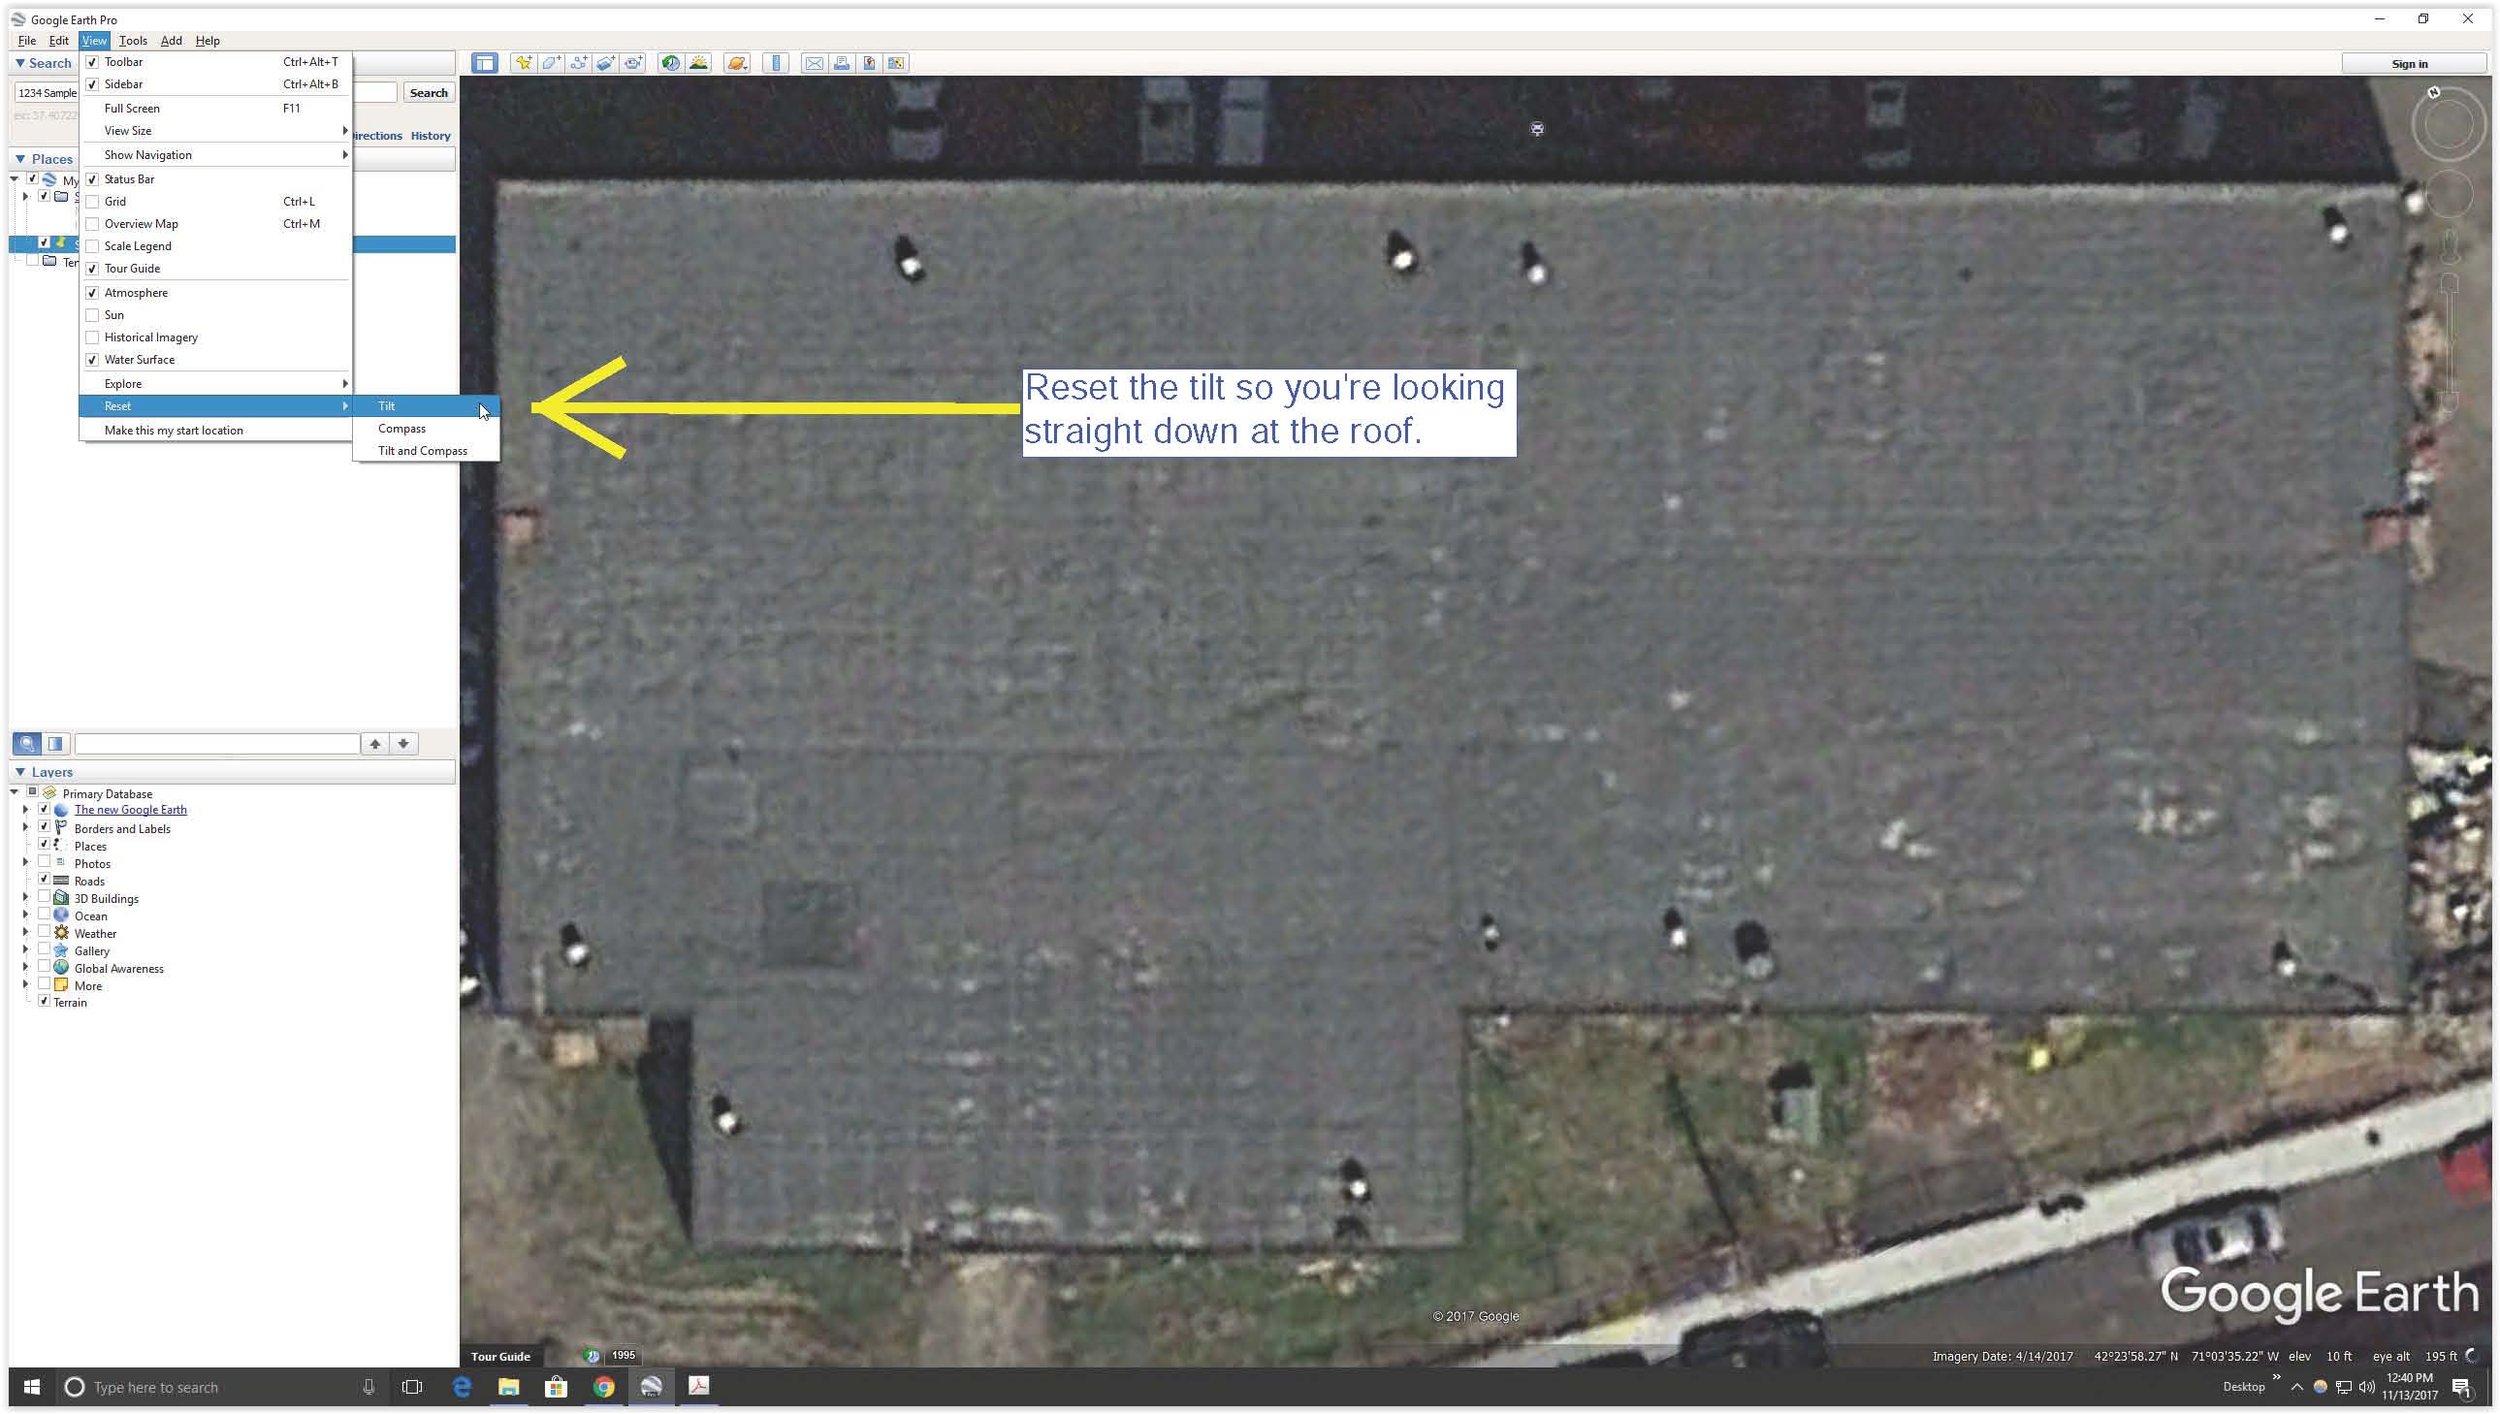
At this point, the image will most likely be tilted so that it looks like you’re viewing the roof at an angle, which can be irritating. This can be fixed with the “Reset” tool.
At the top left, click on “View”. This opens a drop-down menu. At the bottom of this drop-down menu, click on “Reset”.
This will open up another little menu. Click on “Tilt”, and your view of the roof will once again be from straight above.
Do not click on “Compass” or “Tilt and Compass”, or you’ll undo all the rotating you just did.
9. Select Your Measuring Tools
Now you’re ready to go ahead and actually measure a roof.
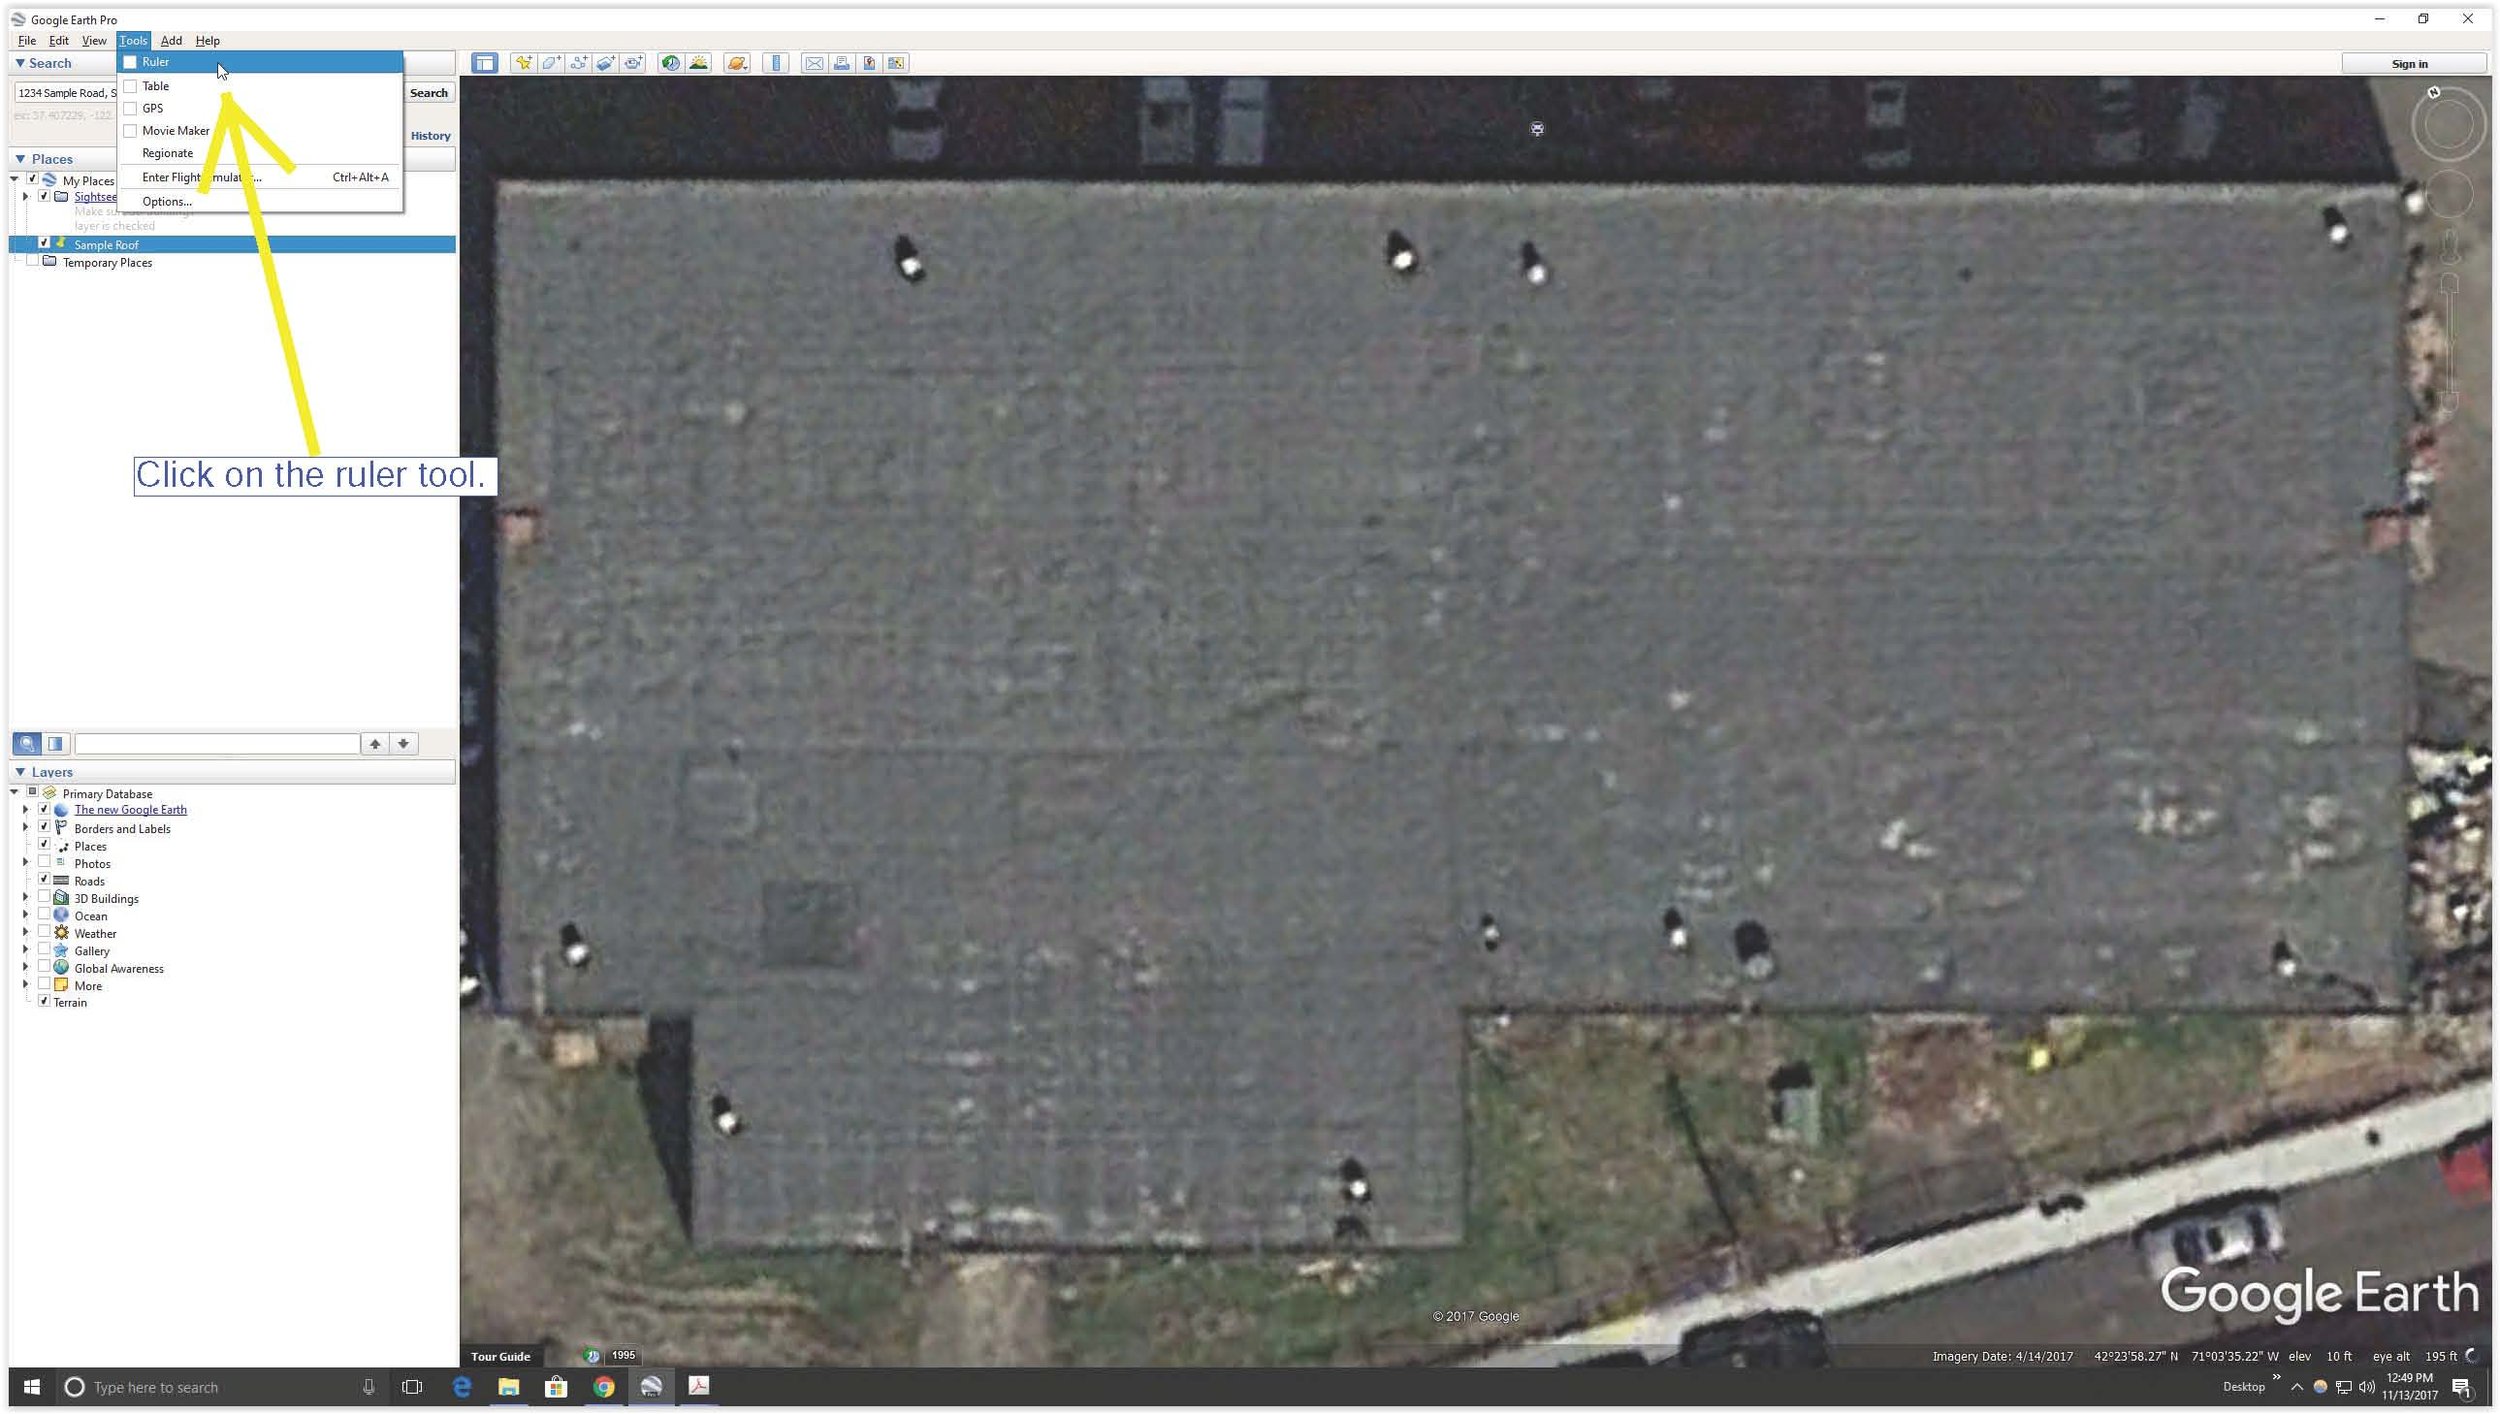
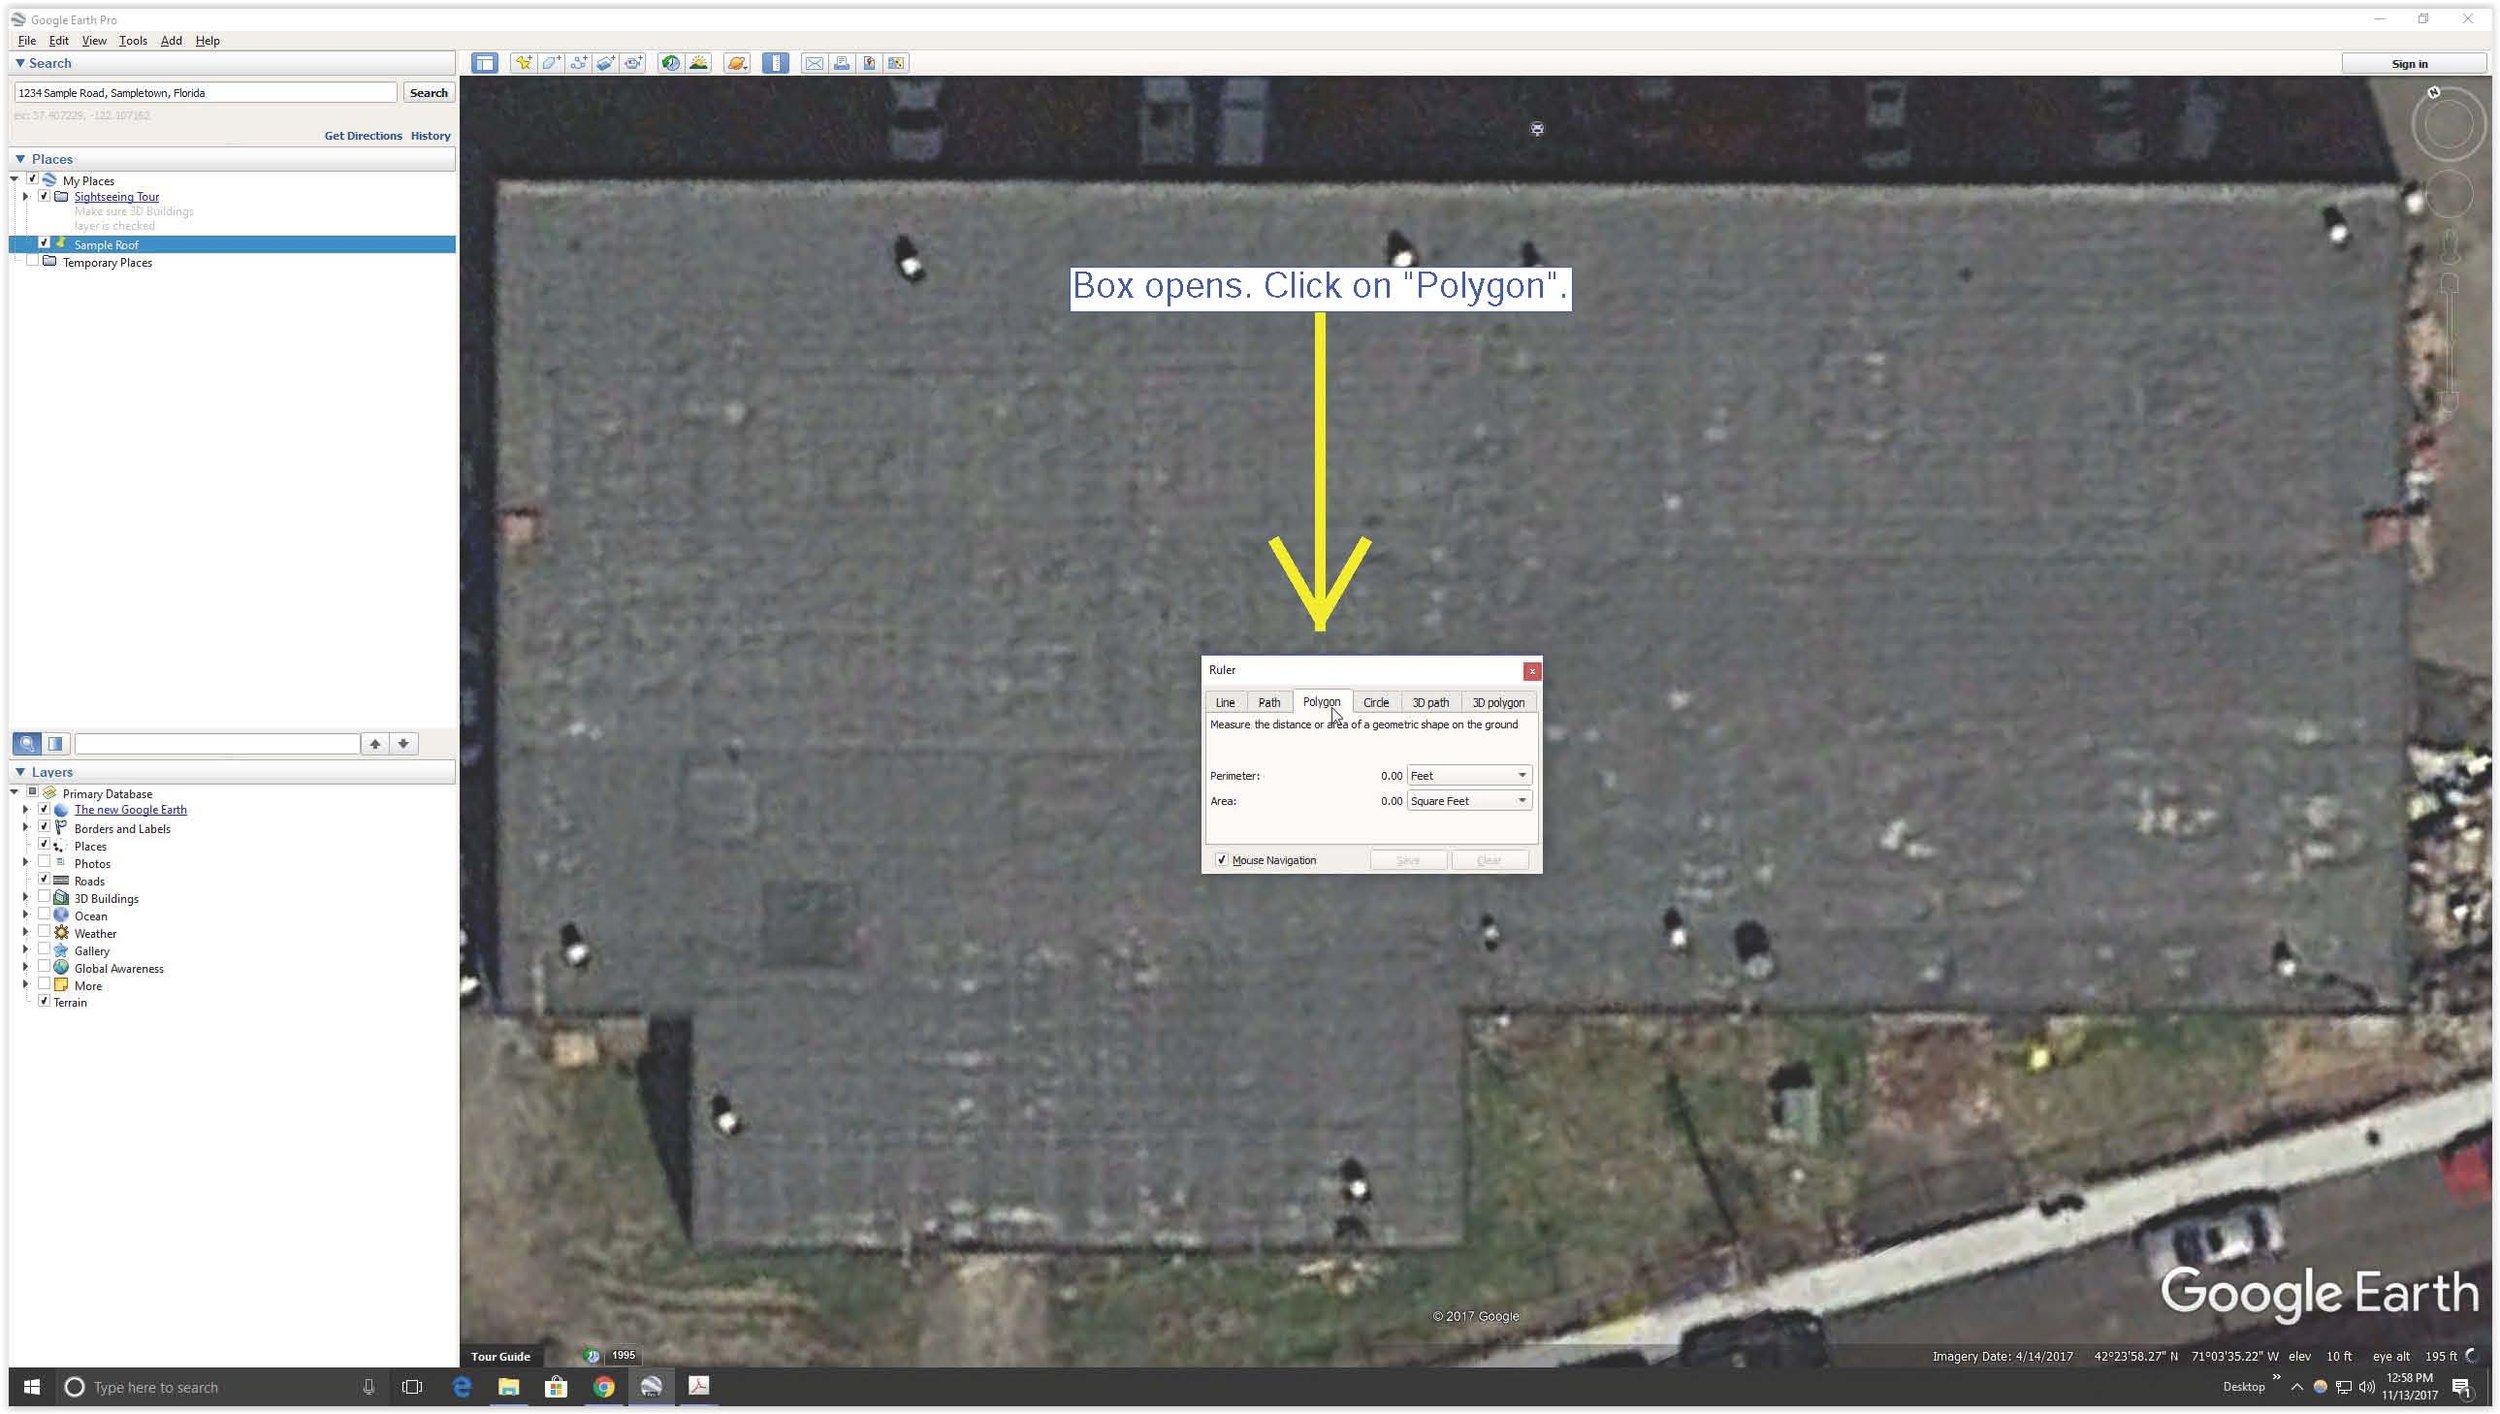
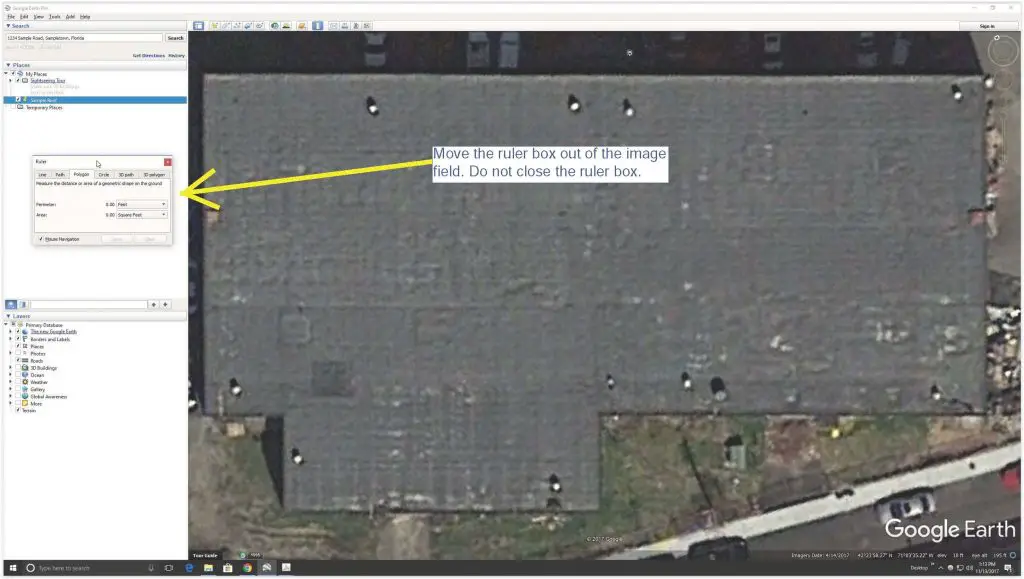
At the top left, click on “Tools”. In the drop-down menu, check the box next to “Ruler”. This opens a box with a little menu across the top. Click on “Polygon”.
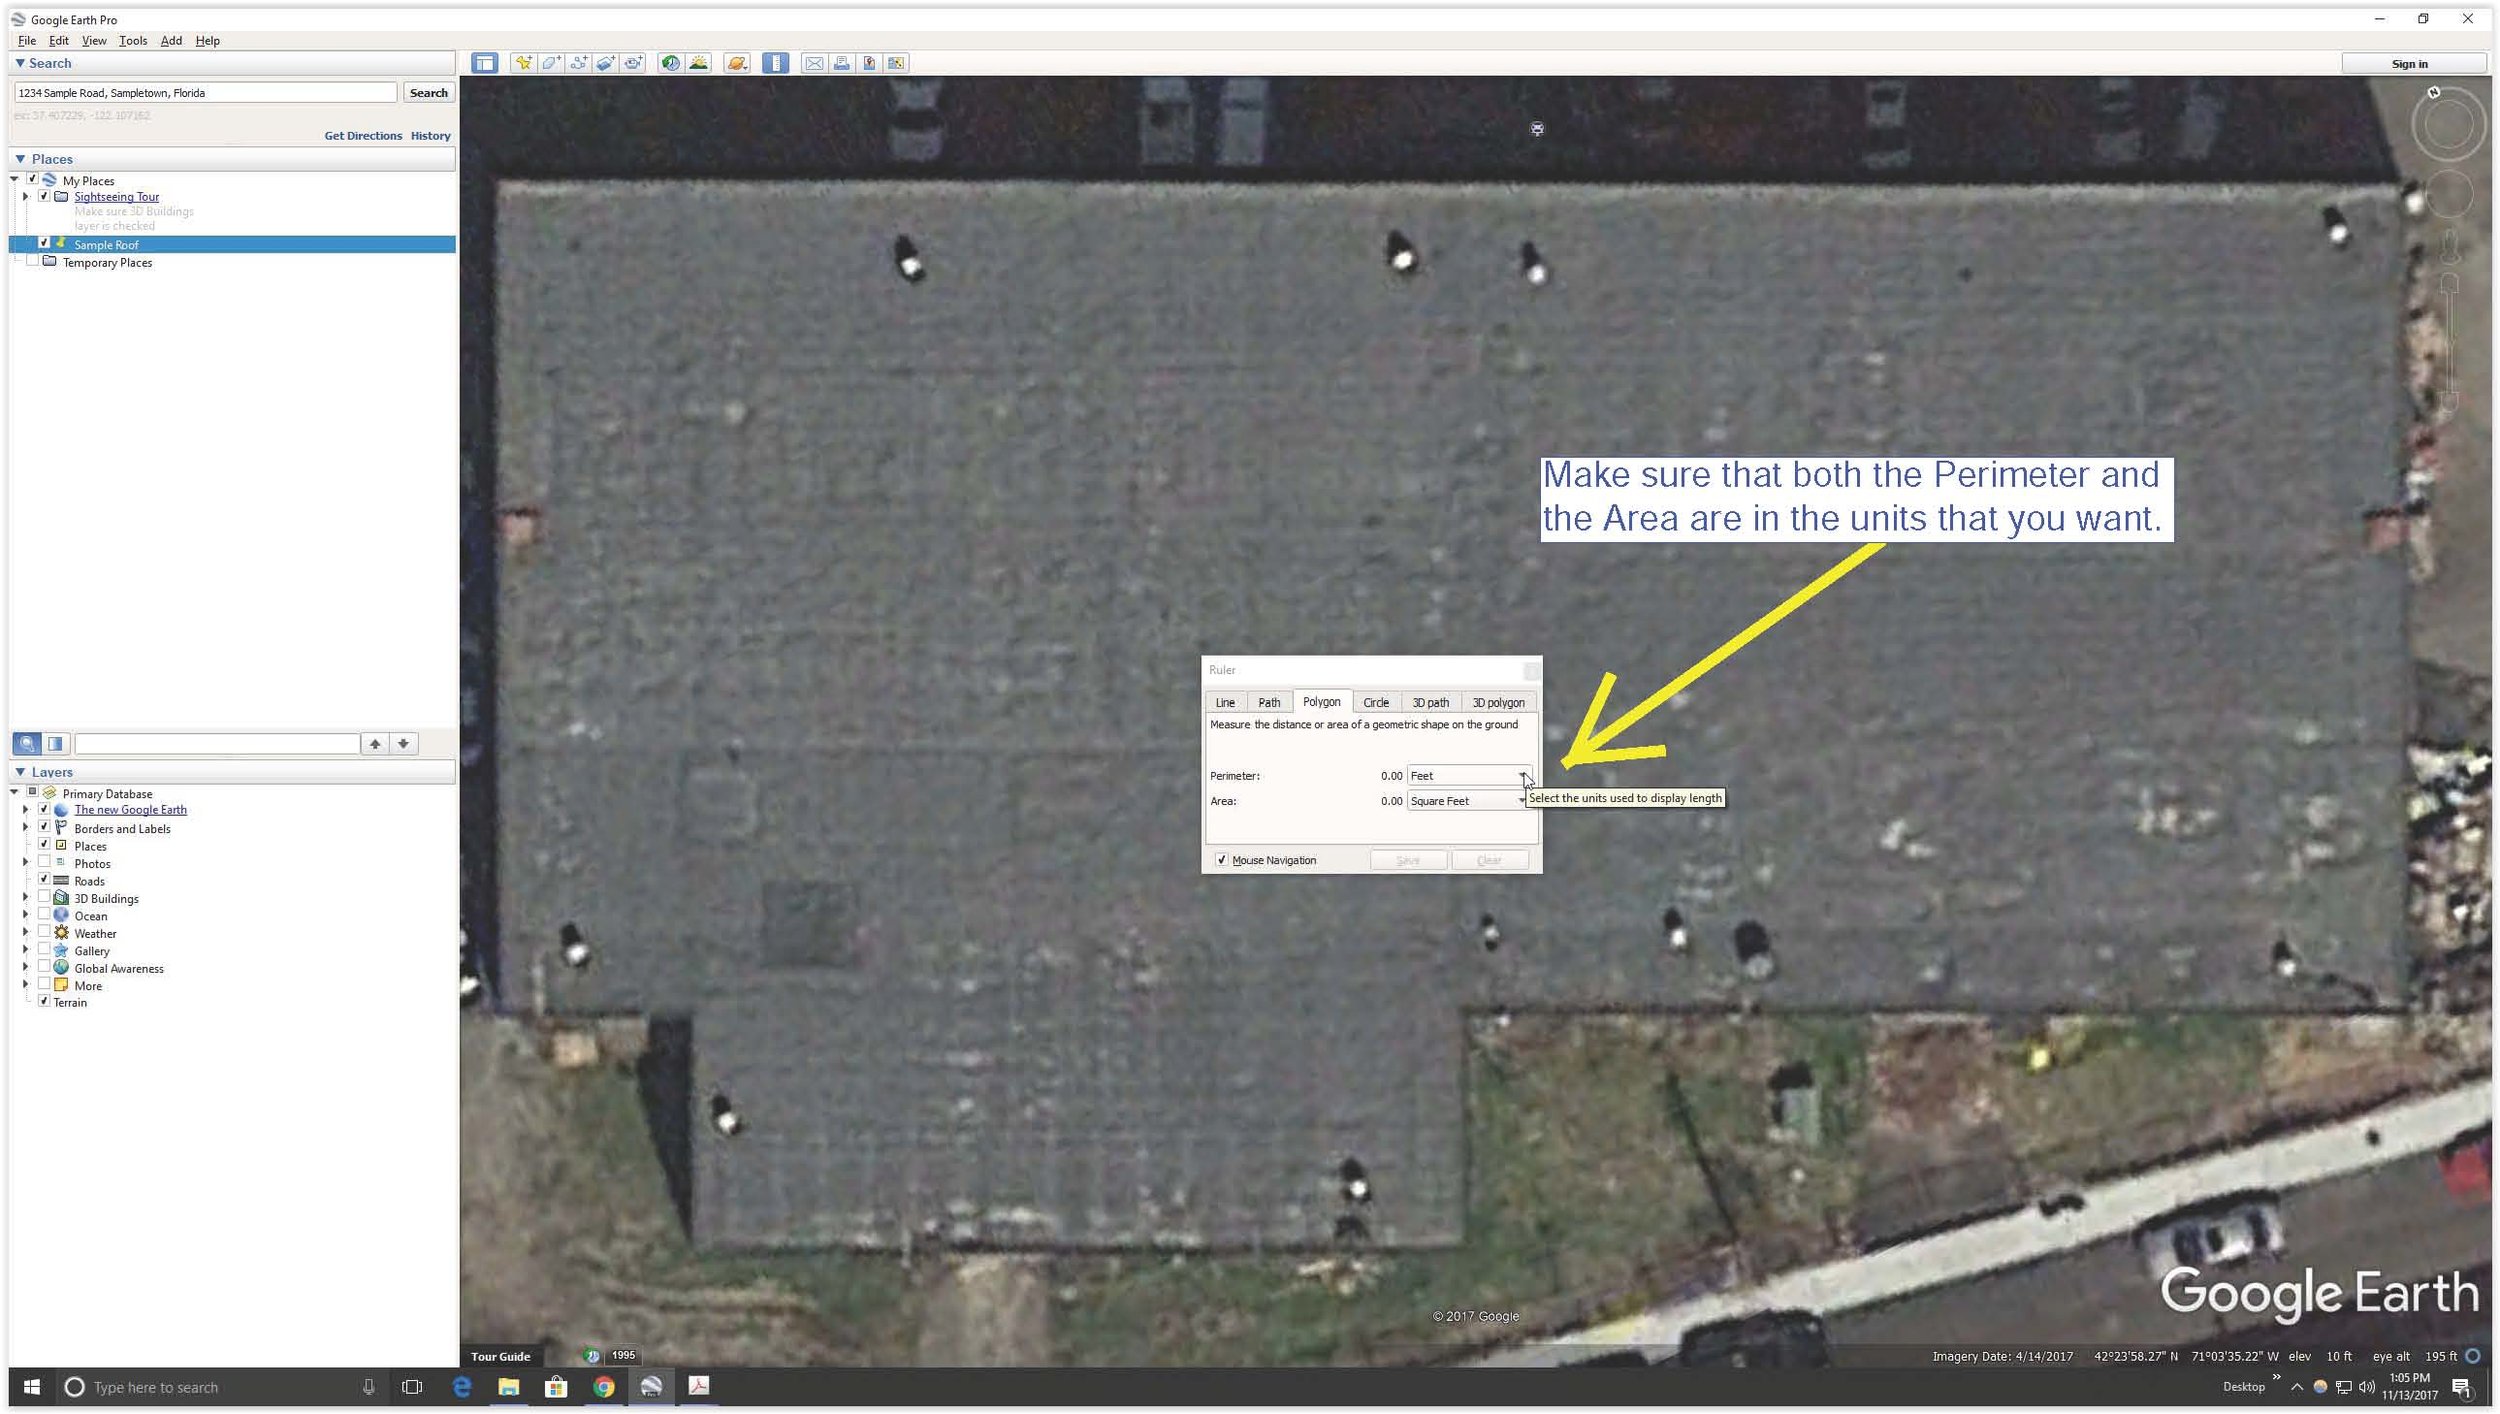
The default unit of measurement should be “feet” and “square feet”. If it isn’t, or if it is but you want a different unit, you can change it by clicking on the little unit fields there.
(You probably shouldn’t use “Smoots” as your unit of measurement; few people have ever achieved such a high level of measurement expertise.)
10. Move the Box out of the Viewing Field
Put your cursor in the top area of the little box, hold down the left mouse button, and drag it out of the image field. Do not close the ruler box.
11. Measure a Roof: Pick Your First Roof Corner
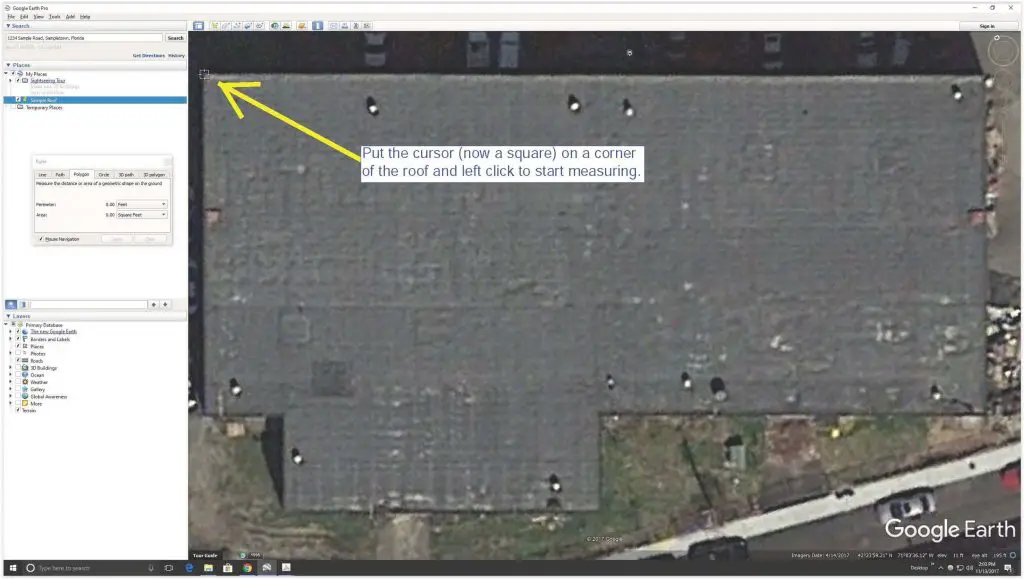
Your cursor is now a little square. Center the square on a corner of the roof and left click your mouse.
This puts a little dot on that corner of the roof.
12. Move to the Next Corner
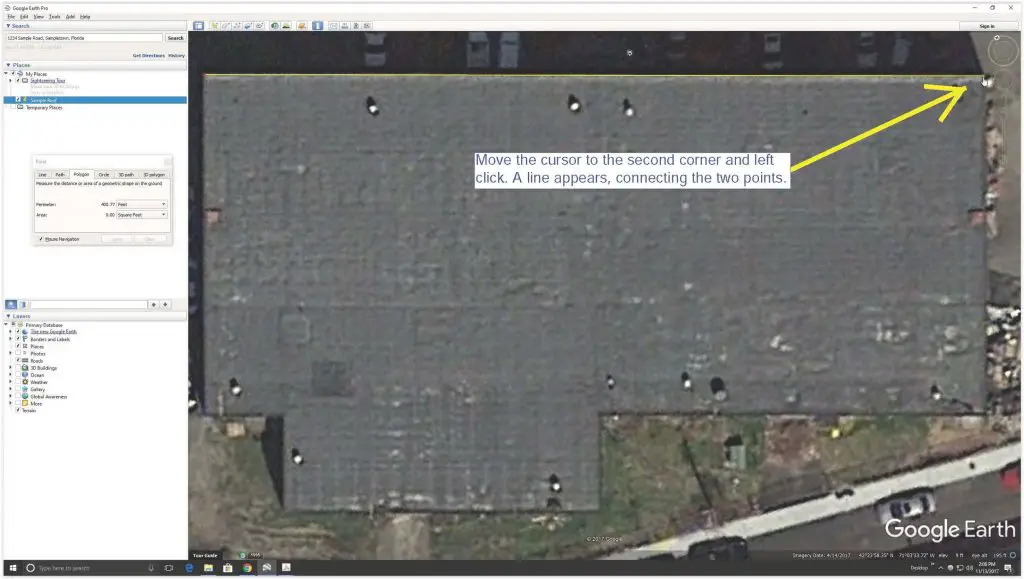
Move to the next corner of the roof and left click.
A line should appear, connecting the two corners. (In the little measuring tools box, the distance of the line should appear.)
13. Move to the Third Corner
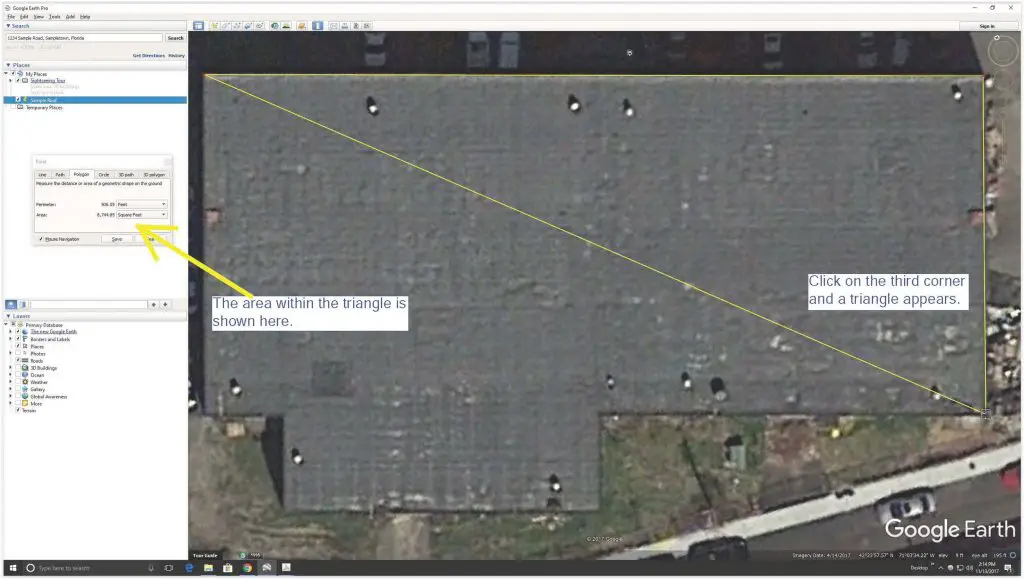
Click on the next corner of the roof. Now you should see a triangle formed by the three corners.
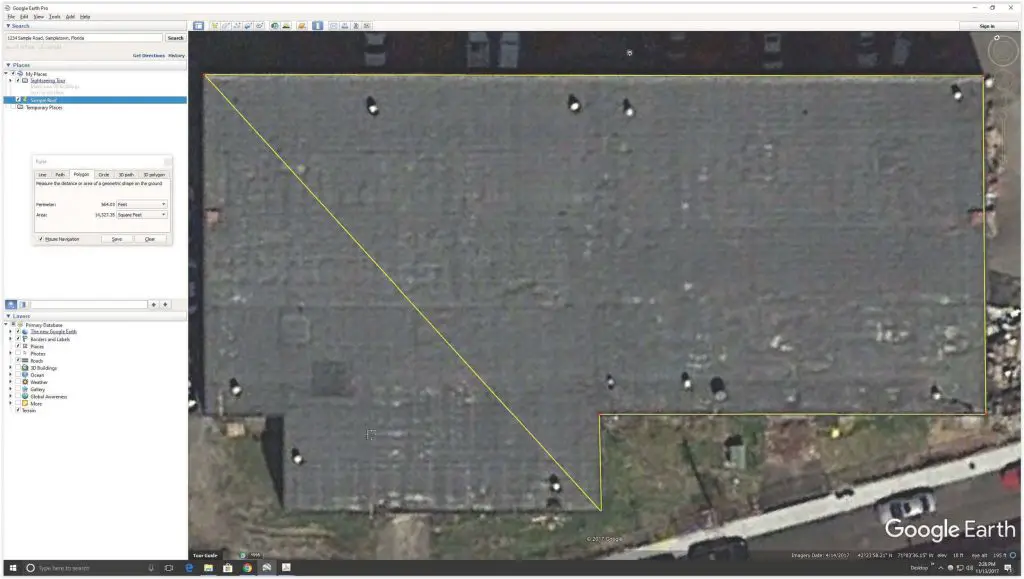
14. Finish Clicking on All the Roof Corners
Continue clicking on the corners of the roof until the lines cover the entire roof perimeter.
YOU MUST GO AROUND THE ROOF IN ORDER, or your line will get messed up and you’ll have to start over.
15. Did You Click on the Wrong Spot?
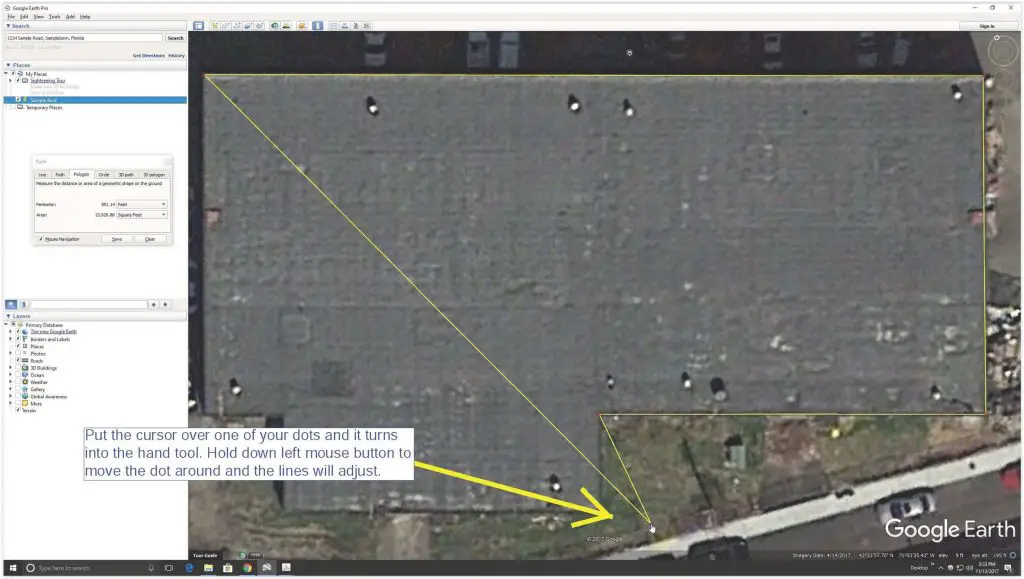
If you click on a corner but the anchor point is not exactly where you want it, you can fix this.
Put the cursor over the problem dot (anchor point, angle), and the cursor will turn back into a hand.
Hold down the left mouse button, and you can drag the dot anywhere you want.
Drag it to where you want it. The lines will adjust themselves.)
16. A Couple of Notes on Adjusting Your Lines
If you right click on a dot, it will disappear, and the lines will adjust themselves accordingly, removing that angle.
You can add a dot anywhere you want, and the lines will adjust to it, adding a new angle.
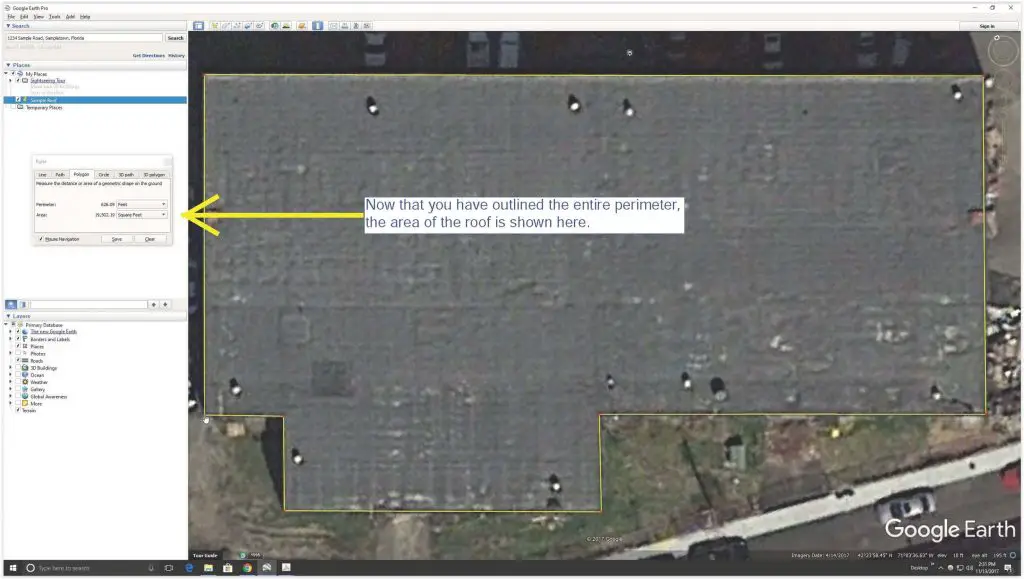
17. Find the Area of the Roof
Now that you’ve gone around the entire perimeter of the roof, look at the ruler box, and you’ll see the area of the roof.
18. Done!
There you go! Now you know how to measure a roof with Google Earth!
About the Author
Jack Gray is a principal roof consultant and vice president at the Moriarty Corporation, an award-winning building enclosure consultant firm founded in 1967. He is also the editor of the Roof Online website.

Mr. Gray has worked in the roofing industry for over 25 years, with training and practical experience in roof installation, roof inspection, roof safety, roof condition assessment, construction estimating, roof design & specification, quality assurance, roof maintenance & repair, and roof asset management.
He was awarded the Registered Roof Observer (RRO) professional credential in 2009.
He also served as an infantry paratrooper in the 82nd Airborne Division and has a B.A. from Cornell University. Read full bio.