Roll Roofing: What It Is, Pros, Cons, Installation & More
This article covers traditional asphalt roll roofing.
By Jack Gray, Roof Online Editor
Published August 22, 2024 • Last updated August 28, 2024
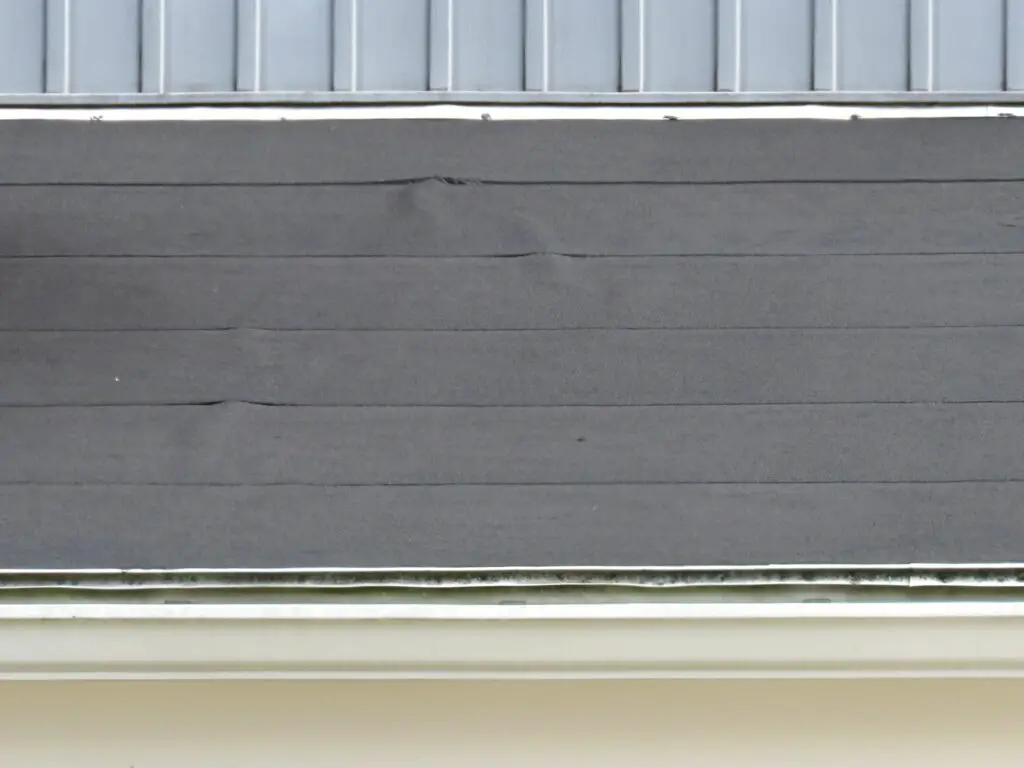
Table of Contents
Introduction
There’s an old joke that contractors like to tell: “Good, fast, cheap — you can only pick two!” This is one of those jokes that contains much wisdom and actually expresses a deep, abiding truth about the world. I even saw it on a bumper sticker once. When I see a roof with roll roofing on it, I know which two they picked…fast and cheap. (Update: I’m being told by several contractors that this is not a joke.)
Roll roofing is typically used (and only recommended for) roofs that need something put on them quick to keep the rain out, but you don’t want to spend too much money doing it. This situation is usually because of some kind of recent roof damage that needs a temporary fix or because you can’t afford to install a better-performing, more permanent type of roof at the moment.
Situations where roll roofing may actually be a preferred choice would be on the less critical roofs on structures like sheds, barns, or carports, where the performance of the roofing material isn’t so important, and doing a cheap re-roofing job every 10 or 15 years is not a big deal.
What Is Roll Roofing?
“Roll roofing” is the common term used for either smooth-surfaced or mineral-surfaced asphalt-coated roofing felts when they are used as a primary roof covering. You might see some people calling it “rolled roofing”, but that isn’t what most knowledgeable roofing professionals call it. Mineral-surfaced roll roofing (or “MSR”, for “mineral surfaced roofing”) is by far the most common type. People do occasionally actually call the mineral surfaced variety “MSR”, but nobody calls smooth surfaced roll roofing “SSR”, because that would make people think you were talking about standing seam (metal) roofing.
Roll roofing is basically a giant piece of what would be a cheap asphalt shingle if it were a lot smaller. It’s made pretty much the same way as shingles are, but it’s produced in three-foot wide rolls about 33 to 36 feet long instead of being cut up into individual shingles. The rolls are almost always designed to cover one roofing square (100 square feet) when installed, so variations in product dimensions are usually on account of the manufacturers having different installation guidelines regarding the amount that one roll should overlap another when they are installed.
Like asphalt shingles, roll roofing is composed of an asphalt-saturated reinforcement mat coated with layers of asphalt on both sides and topped off with a layer of protective mineral granules on the top surface. Unlike high-end asphalt shingles, the asphalt used in roll roofing is not modified with the addition of rubber or plastic polymers to improve resilience or performance in extreme temperatures. If it were modified like this, then it would be modified bitumen roofing, which is its own distinct type of roofing.
Unlike modified bitumen roofing, which the building code allows to be installed on roofs with slopes down to ¼-in-12, roll roofing may not be installed on roofs that have a slope of less than 1-in-12. Also, when you see what looks like roll roofing on a commercial low-slope roof on an office building or a hotel, it’s almost 100% guaranteed to actually be a modified bitumen roof installed with two or three plies (membrane layers).
History of Roll Roofing
Roll roofing dates back to the mid-to-late 1800s, when commercial applications for asphalt-based roofing products were first being explored. When oil refining became big business, and kerosene and gasoline and heating oil sales took off, there was suddenly a lot of leftover asphalt as a result. People began looking for ways to use it. Although it wasn’t as good of a low-slope roofing material as coal tar pitch, asphalt-based built-up roofs began to be installed. As a component of built-up roofing, asphalt-saturated and asphalt-coated felts were produced. It wasn’t much of a leap to give these felts an extra coating of asphalt and a protective surface, and simply start using them as a cheap roofing material in their own right.
This technique only became possible with the increase in asphalt availability as a byproduct of the oil business; the main material used in low-slope roofing at that time was coal tar pitch, and coal tar pitch does not perform well on slopes greater than ½-in-12. Unlike asphalt, coal tar pitch always remains slightly fluid, and if it’s installed on steeper roofs it will tend to slowly slide or drip down the roof.
Roll roofing was originally manufactured using organic felts made out of cellulose derived from raw materials like wood chips or old rags and paper. In the second half of the 20th century, in an effort to find a cheaper substitute for organic felts, manufacturers developed reinforcement mats made out of fiberglass or polyester, which turned out to perform better, having greater moisture resistance and dimensional stability compared to the cellulose-based felts. Some people do still swear by organic felts, though, which actually perform better than fiberglass in very cold weather. An interesting thing is that asphalt shingle manufacturers stopped producing shingles with organic mats around 2010, but you can still buy roll roofing than uses organic felts.
Why People Use Roll Roofing
Roll roofing is relatively very easy to work with. It doesn’t take a lot of skill or experience to install a functional roof using it. Unlike shingles and tiles and single-ply systems that are intended to last for decades, roll roofing is somewhat forgiving when it comes to installation errors and sloppy application. It can generally be applied quickly with a hammer and nails, chalk line, tape measure, roof cement, and a trowel for applying the roof cement. This makes it a fairly popular choice for DIY roofing projects on sheds, garages, and other smaller structures where roof performance failures aren’t likely to cause catastrophic interior damage.
Higher-quality roll roofing may also be used by professional roofers on small low-pitched roofs (over porches, for instance) for which shingles may not be suitable. A word of advice: if you’re having a new roof put on your house and you do have a low-sloped area like that, ask the contractor ahead of time what material he’s planning to use on the low-sloped part of the roof. If he says roll roofing, you should insist on modified bitumen and let him revise his price to account for the higher material cost (the labor should be about the same). Modified bitumen can be installed in cold-process adhesive or even as a peel-and-stick (self-adhering) membrane, so there shouldn’t be any need for open flames or hot asphalt. The modified bitumen might last as long as your shingles, but using roll roofing means you’re definitely going to have to get a part of your roof redone before you need a full re-roof, which is going to be more expensive in the long run.
The main reason people use roll roofing is the price. It’s basically the cheapest roofing material you can get. It typically costs less than half of what the same coverage in asphalt shingles costs, and asphalt shingles are themselves some of the cheapest roofing materials. You can compare the prices for yourself on the Home Depot website: roll roofing at Home Depot vs. asphalt shingles at Home Depot. (Note that a roll of roll roofing typically covers roughly the same amount of roof area as three bundles of shingles.)
Pros of Roll Roofing
- It’s Cheap: Roll roofing is the cheapest roofing material available. It is cheaper than all other roofing materials, including the cheapest asphalt shingles, metal roofing, or single-ply membrane material.
- It’s Easy to Install: Roll roofing is relatively easy to install; that is, if you’re not afraid to get your hands dirty and you have even a little bit of experience with DIY projects, it shouldn’t be hard at all. Compared to installing an asphalt shingle roof, for instance, it’s quite simple and much harder to screw up.
- It’s Fast: Since it comes in large rolls and doesn’t require nearly as much fastening as shingles, you can cover a large area in a short time. This makes it good for emergency repairs when you have to get a roof put on fast, or for any other project where time is a big concern.
- It Can Be Used on (some) Low-Slope Roofs: Roll roofing will function (and is permitted by code) on low-slope roofs down to a slope of 1:12. Shingles aren’t allowed (and don’t work) on roofs below 2:12, so roll roofing may be your only option until you can get a professional low-slope roofing installer out to do the job.
- A Choice of Installation Methods: Roll roofing can be installed in a few different ways (see below). Techniques like the concealed nail method, exposed nail method, and double coverage method let you be more or less thorough in the application depending on what kind of service life and performance you hope to get out of the roof.
- It’s Lightweight: Roll roofing is lighter than most other common roofing materials, including asphalt shingles, so material weight (and whether the structure is strong enough to handle it) is just one more thing you don’t have to worry about.
- Acceptable for Small Structures: Roll roofing is suitable for small roofs like those on sheds, lean-to structures, and some porches and garages, where appearance, service life, and performance are not as important as basic weatherproofing and cost.
- Relatively Few Laps/Seams: Since roll roofing comes in large rolls, there are fewer laps and joints compared to shingles, which reduces the number of possible leak points that an inexperienced installer will have to worry about.
- It’s Easy to Repair: You can easily repair roll roofing with some asphaltic roof cement and another piece of roll roofing. Sometimes you can patch it with just the roof cement. Since it’s made of asphalt, it’s compatible with asphalt, which is a plus.
Cons of Roll Roofing
- Short Service Life: Roll roofing typically has a far shorter lifespan compared to other roofing materials. It typically lasts around 5 to 10 years, maybe up to 15 years under optimal conditions using the double coverage installation technique. I don’t believe I’ve ever seen a material warranty for regular roll roofing that was good for longer than 5 years. The material is simply not designed to last, but installation quality and the local climate will play a role.
- Not Ideal for Steep Roofs: Although it can of course be installed on steeper roofs, roll roofing is not recommended for roofs with a pitch greater than a 3:12 because it lacks the structural integrity of materials designed for pitched roof applications (like shingles). It performs best on slopes from 1:12 to 3:12.
- Cannot Be Used on Many Low-Sloped Roofs: It’s very common for low-slope roofs to have slopes under 1-in-12. They are typically allowed by code to have slopes as low as ¼-in-12. The building code states that roll roofing cannot be used on slopes less than 1-in12.
- Susceptible to Damage: A roll roofing membrane is thinner and weaker than other roofing materials, making it more susceptible to both mechanical damage such as from foot traffic, and environmental damage from high winds, hail, and thermal cycling.
- Highly Susceptible to UV Damage: As with asphalt shingles, the protective mineral granules on roll roofing are there to protect the asphalt from the sun, but due to a (typically) lower-quality manufacturing process, the granules are not embedded as well and they tend to fall off over time. The large continuous pieces (the rolls) that make up a roll roofing installation also experience much larger expansion and contraction factors than asphalt shingles, which doesn’t help with keeping the granules on. If you’re going to install roll roofing, especially in hot, sunny climates, you should really consider coating the roof with a reflective aluminum roof coating.
- It Doesn’t Look Good: Everybody’s thinking it, I just said it. It’s generally considered unattractive, which is another reason to restrict its use to low-slope roof areas or the roof on the shed behind the house that you can’t really see.
- Prone to Leaking: The seams in roll roofing tend to open up over time as the roof cement used as a sealant ages and turns brittle. The roll roofing material may wrinkle due to thermal expansion and contraction, with the wrinkles often causing seams, end laps, and perimeter edges to delaminate. This is real problem on low-slope roofs where the water drains slowly, and may be blown by the wind into these openings.
- Prone to Buckling and Wrinkling: If it’s not properly installed or particularly if the material is installed during cold weather, roll roofing can buckle or wrinkle over time, creating openings where water can get in.
- Few Color Choices: While roll roofing may come with colored mineral granules like asphalt shingles do, unlike with asphalt shingles the color selection for roll roofing is generally restricted to black, tan, and a few shades of gray.
- Not Meant for Residential Structures: Roll roofing is normally considered a temporary or secondary roofing solution, not intended for long-term use on permanent structures like houses.
- Restricted Conditions for Installation: Roll roofing must be installed in warm weather for best results. Cold or wet conditions can cause problems with adhesion, flexibility, and dimensional stability, which can cause problems both during and especially after installation.
- Tears and Punctures: Because the material is relatively thin and weak, roll roofing is more easily torn or punctured by sharp objects like tools, falling or wind-blown debris, or even improper handling during installation.
- Seams and Edges Can Deteriorate: As it ages, the seams and edges of roll roofing, and the roof cement used to seal them, can deteriorate. This can be more pronounced in areas with a lot of rain, wind, and/or freeze-thaw cycles, This makes it more likely to leak than other materials.
- Susceptible to Wind Uplift Damage: Roll roofing is not fully-adhered (unlike modified bitumen, for instance) and has relatively few fasteners per square foot (compared to shingles, for instance), so it can be vulnerable to wind uplift, especially as it ages and if it’s not properly adhered or nailed. This can lead to parts of it being torn off in strong winds.
- You Have to Keep an Eye on It: Because so many things can go wrong with it, roll roofing requires more frequent monitoring compared to longer-lasting, better-performing roof systems.
- Doesn’t Play Well with Others: Roll roofing depends on the integrity of the seams to function properly, which means that it needs to be applied to a clean, flat, smooth surface. It shouldn’t be applied over existing materials like shingles, because these don’t provide an acceptable substrate. With roll roofing, unlike with new shingles, which can be installed over old shingles, the old material will need to be completely removed before installation.

How to Tell Roll Roofing and Modified Bitumen Apart
Since they’re both asphalt-based, come in rolls, and normally have a granule surface, it can be hard to tell roll roofing and modified bitumen roofing apart simply by looking at them, but this should help:
- Material Characteristics and Appearance:
- Roll Roofing is a low-quality asphalt-based product often used for temporary roofing or on less important structures. It is far less flexible than modified bitumen, and you can typically tear a little piece off a corner of the material just using your fingers. Roll roofing is sold in rolls that are typically 36 inches wide, so the exposure (the visible surface of the installed rolls) will normally be less than 3 feet wide, sometimes a lot less, depending on the installation technique. It has a life expectancy of about 5-15 years, and will show signs of deterioration fairly early.
- Modified Bitumen Roofing is a high-quality polymer-modified asphalt product that is tougher and more flexible than roll roofing. Modified bitumen is installed in rolls that are typically 39 inches wide, which produces a 36-inch exposure with a typical 3-inch side lap (where one roll overlaps the next along the length of the roll). Mod bit systems have a longer life expectancy, usually 20 – 30 years. If you try to tear off a piece of modified bitumen, you will probably have a very hard time doing it, if you can at all. The asphalt in modified bitumen is stronger and more resilient due to the modification polymers, and modified bitumen sheets usually have a strong polyester reinforcement mat, whereas roll roofing will almost always have a weaker cellulose or fiberglass mat.
- Installation Clues:
- Roll Roofing is typically installed as a single layer (although it may sometimes have up to a 50% overlap, which technically means there will be two layers of roofing at any point on the roof). It is nailed in place, often with exposed nails (which should be covered with spots of roofing cement). The laps are typically sealed with roof cement, so dried roof cement is typically visible at the seams/laps. It will not typically be used as a flashing material.
- Modified Bitumen Roofing is properly installed with at least two layers and sometimes three. A proper modified bitumen system is never nailed. The modified bitumen membrane is applied via torching, hot mopping, cold-applied adhesives, or using peel-and-stick rolls. All of these installation methods except peel-and-stick will produce a small amount of “bleed-out” along the edges of each roll, especially at the end-laps. During installation, manufacturers require roofers to embed handfuls of granules in the bleed-out to protect the material and to match the rest of the roof. If you see asphalt bleed-out, it’s a mod bit roof.
- Visible Defects:
- Roll Roofing will often develop wrinkles over time. Roll roofing will not normally develop interply roof blisters. Because it’s typically a one layer application, and not fully bonded to the substrate, any air, water vapor, or other gasses will be able to escape from the membrane instead of being trapped (inside a blister).
- Modified Bitumen Roofing does not tend to wrinkle, but it often develops roof blisters, which are caused by air and moisture trapped within the membrane, usually between the two layers of the application. Learn more about mod bit roof blisters here.
Quick Check: The quickest way to tell them apart is to check the width of the rolls. Roll roofing comes in 36-inch-wide rolls, so an installed course of roll roofing should be less than 36 inches wide. Modified bitumen comes in 39-inch-wide rolls, so an installed course of modified bitumen, with a typical 3-inch lap, should be 36 inches wide. You can also check the flexibility of a small piece of the material. Roll roofing is more brittle and breaks easily, while modified bitumen bends without breaking. If you fold a small piece of the roofing in half, the roll roofing will likely crack, and the mod bit won’t.
Manufacturing Process
Roll roofing is manufactured in a manner very similar to the way asphalt roof shingles are made. The product starts off with a felt base, or reinforcement mat, to which the other material components are added. This mat can be organic (made from cellulose derived from materials such as wood chips, cotton rags, paper, or sawdust) or inorganic (made from fiberglass or polyester).
The felt is first saturated with asphalt to waterproof it and improve its ability to bond with the coating asphalt. After it’s saturated, the felt is coated with a layer of asphalt on each side. Ceramic-coated mineral granules are typically embedded into the coating asphalt on the weathering surface (the top side) of the roll to produce mineral-surfaced roofing (MSR). The purpose of the granules is to protect the asphalt from UV rays, enhance fire resistance, and improve the abrasion resistance of the material.
The rolls can manufactured in a variety of weights and widths, but rolls that are 36 inches wide and 36 feet long are by far the most common.
Material Components
Asphalt
Asphalt is the key waterproofing agent in roll roofing. It is applied as a saturant and coating on the roofing felts. Mineral stabilizers like limestone powder and silica are added to the coating asphalt to improve weather resistance and add shock-proofing properties, extending the service life of the roofing material. The asphalt used in roll roofing is derived from refined petroleum and serves multiple purposes:
- Waterproofing: Asphalt saturates the felt material, creating a moisture barrier that prevents water from seeping into the roof deck or structure.
- Adhesive Properties: The asphalt acts as a binder, holding the fibers in the felt together and helping to attach the roofing material to the substrate. It also aids in bonding overlapping sections of roll roofing, ensuring a tight seal.
- Weather Resistance: Asphalt provides resilience against weathering by protecting the roof from rain, snow, and extreme temperatures. When combined with mineral granules, it offers further UV protection, which prevents the asphalt from breaking down due to prolonged sun exposure.
- Flexibility: Asphalt allows the roofing material to remain flexible, even in low temperatures, which helps reduce the risk of cracking or splitting under stress.
The quality of the asphalt used in roll roofing can vary, influencing the overall performance of the product. High-quality asphalt typically contains additives that improve its longevity, reduce brittleness, and increase its resistance to aging and wear
Felts/Reinforcement Mat
Organic Felts:
The materials used in roll roofing include organic felts (cellulosic, derived from wood fiber, paper, sawdust). Organic felts tend to absorb moisture in humid climates, which causes swelling and shrinking. In cold climates, however, they tend to perform better than fiberglass, which can become very brittle in freezing temperatures.
Inorganic Felts:
Fiberglass and polyester are the two types inorganic felts, offering better moisture resistance and strength. Fiberglass is especially valued for its dimensional stability, while polyester offers high resistance to puncture and tearing.
Fiberglass offers significant advantages over organic materials due to its superior moisture resistance and dimensional stability. Unlike organic felts, which tend to absorb water and are prone to swelling and shrinking, fiberglass remains stable under different weather conditions. This stability helps prevent issues like buckling or warping of the roofing material, making fiberglass a preferred choice for longer-lasting and more durable roll roofing applications.
Mineral Granules
Toward the end of the manufacturing process, ceramic-coated mineral granules are applied to the weathering surface (the top) of roll roofing. These granules come in a (limited) variety of colors so the consumer can pick a roof color he likes.
The mineral granules on roll roofing serve primarily to protect the underlying asphalt from UV rays and weathering. These granules are embedded in the surface of the roofing material and play a role in enhancing its durability, strength, and fire resistance. Additionally, they contribute to the overall aesthetics of the roofing by offering color variations.
The granules also help prolong the service life of the roofing material by providing a protective barrier that reduces wear and tear caused by exposure to the elements.
Installation Techniques
Please remember that no matter what you read here or anywhere else about roll roofing installation, you should always follow the manufacturer’s installation instructions. Failure to follow the manufacturer’s recommendations and guidelines may void your product warranty and may even violate building codes, which often state that roofing materials “shall be installed in accordance with this chapter and the manufacturer’s instructions“.
You should never try to torch down regular roll roofing. The material is not designed for that and you’ll ruin it and probably set your shed on fire.
Concealed Nail Method
The concealed nail method for installing roll roofing is a technique that prioritizes protection against water infiltration, particularly on low-slope roofs where water drainage is slower. Here’s a detailed explanation of the method:
- Preparation: The concealed nail method is specifically recommended for slopes with a 1:12 pitch or less, where exposed nails could allow water to seep in due to the slow runoff. This method involves hiding the nails under layers of roofing material to prevent exposure to the elements.
- Installation Steps:
- Start by snapping a chalk line across the roof approximately 35 1/2 inches from the eave to position the first strip of roll roofing.
- Nail only the top edge of the strip, placing nails about 3/4 inches from the edge and every 4 inches along the top. The edges of the strip along the rakes and eaves should be coated with roofing cement, but not nailed, to prevent exposure to water.
- Overlaps between strips should be at least 6 inches. The lower layer is nailed down, coated with roofing cement, and then the top layer is pressed into the cement. This ensures a watertight seal.
- Layering and Continuation: Continue up the roof by positioning subsequent strips of roll roofing 4 inches below the upper edge of the previous strip. Nail along the top edge and use roofing cement along the overlap to create a strong bond. When approaching the top edge of the roof, the ridge should be covered with metal drip edging, secured with nails spaced every 6 inches.
- Key Considerations:
- This method works best on shed roofs or similar low-pitch applications without hips or ridges.
- Special attention is needed to avoid cracking or improperly securing the roofing material, particularly in valleys where water is most likely to collect.
This method provides superior protection in areas where water runoff is a concern, offering better durability than exposed nail methods.
Exposed Nail Method
The exposed nail method for installing roll roofing is a more straightforward technique compared to the concealed nail method. Here are the key details of the process:
- Positioning and Initial Fastening: To begin the exposed nail method, the roofer positions the first roll of roofing material along the eave, aligning it with a chalk line snapped 35 1/2 inches up from the eaves. Nails are placed along the top edge, spaced every two feet and positioned 3/4 inches from the edge. The rake and eave edges are then secured with nails placed 3/4 inches from the edge and spaced three inches apart.
- Overlapping Rolls: If a single sheet of roll roofing does not cover the entire roof width, the next roll is overlapped by six inches. The first sheet is nailed down, then coated with roofing cement, and the overlap is secured in place. This ensures that the overlap creates a waterproof seam.
- Subsequent Layers: For the subsequent layers, a chalk line is snapped two inches below the top edge of the previous course. The upper edge of the next strip is tacked in place, and a two-inch-wide layer of roofing cement is spread along the top edge of the first strip. The second course is then nailed over the cement, following the chalk line for alignment. Joints between courses must be staggered to prevent them from aligning directly above one another.
- Special Considerations: This method is typically used on low-slope roofs where water runoff is slow. The method is faster than concealed nailing but leaves the nails exposed to the elements, which can reduce the durability of the roofing system. Proper care must be taken to ensure that the nails are securely driven and properly placed.
- Hips and Ridges: For hips and ridges, a strip of roll roofing six inches wide is cut and bent to fit over the joint. The strip is nailed in place, and any end-laps are overlapped by six inches and coated with roofing cement.
In summary, the exposed nail method is simpler and faster but can be less durable due to the exposure of nails to weather. It is commonly used in certain applications where the roof slope or other conditions allow for this faster installation method.
Double Coverage Method
The double coverage method is considered the most durable of the three primary roll roofing methods. Here are the key details:
- Material: Double-coverage roll roofing typically uses a roll roofing sheet that is 36 inches wide. Of this width, 19 inches is reserved for the selvage edge (overlap), and 17 inches is intended for exposure. Different manufacturers finish the selvage portion in various ways, such as saturating or coating it. This roofing can be applied with either hot or cold asphalt adhesives, depending on the manufacturer’s specifications.
- Installation Process:
- Start by snapping a chalk line across the roof about 35 1/2 inches from the eave.
- The first strip of roofing material is positioned along this line. It is nailed along the top edge, leaving the bottom section of the sheet unsecured for now.
- The selvage edge of the roofing strip (19 inches) is folded back while an adhesive (cold or hot asphalt) is applied to the exposed portion of the roof. The roofing is then pressed into the adhesive and securely rubbed down.
- Nails are spaced approximately 12 inches apart along the top edge of each strip.
- Each subsequent layer is overlapped by 19 inches to ensure double coverage, which is why one roll of material covers only half of the standard square footage.
- Advantages:
- This method provides excellent protection due to its double-layer system, which is particularly suitable for low-pitch roofs with a minimum slope of 1 in 12.
- It can extend the lifespan of the roof by offering better protection against water infiltration.
- Adhesive Application: The adhesive is brushed on with care to ensure that it reaches the lap line between layers of material. This helps to seal the roof thoroughly and prevents water from penetrating the overlaps.
- Important Considerations:
- Roll roofing, including double-coverage applications, should not be installed in cold weather. In cold climates, the material may not adhere properly. If needed, allow the material to warm up in the sun before proceeding with installation.
- The roofing material must be installed in a way that avoids exposed nails, as they can lead to leaks over time.
The double-coverage method is particularly valued for its durability and is frequently chosen for low-pitched roofs.
Special Applications and Repairs
Roll roofing is ideal for specific applications such as valley coverage and minor repairs. For valleys, double layers of roll roofing or metal strips can be used. Proper application is essential to prevent issues like premature wear or leaks.
Valley Coverage
- Valleys are the areas where two roof surfaces meet and channel water, making them especially prone to wear and leaks. Roll roofing is commonly used to provide additional protection in valleys because of its seamless installation.
- Installation: When using roll roofing in a valley, it’s essential to apply at least two layers of material to reinforce the area. The first layer should be cut to fit the valley and secured in place with roofing nails. The second layer should overlap the first by about six inches and should be adhered with roofing cement to create a watertight seal.
- Metal Valley Flashing: In some applications, special-purpose metal valley flashing (typically galvanized steel or aluminum) is also used in the valley before laying the roll roofing. This sheet metal provides an added layer of protection by helping water flow smoothly down the valley and off the roof without penetrating the roofing material.
Repairs in General
- Repairing Leaks: Roll roofing is often used for spot repairs on existing roofs, particularly for addressing leaks. When repairing a roof leak, first identify the source of the leak. If a portion of the roll roofing has torn or deteriorated, cut away the damaged section, ensuring that you extend beyond the damaged area by several inches to remove any weakened material.
- Patching: Cut a new piece of roll roofing to the size of the section you’ve removed. Spread a thick layer of roofing cement on the back of the patch, then press it firmly into place over the damaged area. Apply an additional layer of roofing cement over the patch’s edges to seal it. If using nails, ensure they are placed carefully and that their heads are coated with roofing cement to prevent water penetration.
Common Structures
- Sheds and Garages: Roll roofing is commonly used on smaller, simpler structures like sheds, garages, and carports. These buildings typically have low-pitched roofs, which makes roll roofing a practical and cost-effective solution. For such applications, installation methods like the double coverage method ensure that these roofs have sufficient durability and protection against the elements.
Repairing Seams and Overlaps
- Seam Repairs: Over time, the seams between overlapping sections of roll roofing can become vulnerable due to exposure to weather, especially if the roofing cement begins to wear away. To repair a failing seam, clean the affected area thoroughly, removing any dirt or debris. Apply a generous layer of roofing cement along the seam, then press the layers back together. For additional reinforcement, you can nail along the seam before applying another layer of roofing cement over the nails and edges of the seam.
Temporary Roof Repairs
- Emergency Fixes: Roll roofing is also useful for temporary repairs or as an emergency fix for leaks or other roof damage. In the event of a sudden leak, a piece of roll roofing can be applied quickly to the damaged area with roofing cement to provide a temporary solution until a more permanent fix can be made.
Edge Protection and Wind Uplift Prevention
- Edge Repairs: Edges of roofs, particularly along eaves and rakes, are susceptible to wind uplift and water damage. For repairs in these areas, ensure that any damaged roll roofing is removed and replaced with new material that extends beyond the roofline. Roofing cement should be applied generously under the edges to help secure the material and prevent wind from lifting it.
Durability of Roll Roofing Repairs
- Lifespan: While roll roofing is not as durable as other roofing materials like asphalt shingles or metal, it can be very effective for repairs and special applications when installed and maintained correctly. For more extensive repairs, especially on larger or more complex roofs, using roll roofing in conjunction with other materials (such as flashing or additional layers of roofing cement) can provide a robust solution.
By focusing on careful application in critical areas like valleys and edges and using proper sealing techniques, roll roofing can effectively serve both as a long-term solution for smaller buildings and as a reliable material for spot repairs and specific applications.
General Tips for Working with Roll Roofing
- Weather Conditions: Install roll roofing only in warm, dry weather. Cold temperatures can make the material brittle and hard to work with, leading to cracking or improper adhesion. Wet conditions can affect the adhesive and cause improper sealing. Always check the weather forecast and plan the installation for a period of clear, warm days.
- Proper Slope: Ensure that the roof slope is appropriate for the method of roll roofing installation. Roll roofing works best on slopes of at least 1:12 for double coverage, while the concealed nail method is ideal for low-slope applications. Avoid using roll roofing on completely flat roofs, as the material is not designed to handle standing water.
- Avoid Exposed Nails: Exposed nails are a common cause of leaks in roll roofing, particularly in low-slope applications where water runoff is slower. Always strive to use installation methods that conceal nails under the roofing material, such as the concealed nail method. In this approach, nails are driven into the top edge of each roll and hidden beneath the overlap of the next layer. This not only protects the nails from direct exposure to the elements but also ensures a more durable, watertight roof. If exposed nails are unavoidable, such as along rakes or eaves, coat the nail heads with roofing cement to create a waterproof seal and prevent water penetration over time. Avoid overdriving nails, as this can compromise the integrity of the material and lead to leaks.
- Edge Sealing: Pay special attention to the edges of the roof, particularly along the eaves and rakes. Apply roofing cement under the edges to create a better seal, helping to prevent wind uplift and water infiltration.
- Material Preparation: Allow roll roofing materials to relax by unrolling and laying them flat for 24 hours prior to installation. This helps prevent rippling, curling, or waves in the material, ensuring a smoother application.
- Overlap Consistency: Ensure that overlaps are consistent across the entire roof to avoid weak spots. The standard overlap for single-coverage installation is around 4 to 6 inches, while double coverage often requires an overlap of 19 inches. Maintain these measurements for uniform protection.
- Nail Placement: For the best results, nail placement should follow manufacturer guidelines. Nails should be placed 1 inch from the edges and spaced approximately 6 to 12 inches apart. Avoid overdriving the nails, as this can puncture the roofing material and cause leaks.
- Roof Ventilation: Proper roof ventilation is critical to preventing moisture buildup under the roofing material, which can lead to condensation and subsequent damage. Make sure that there is adequate airflow through the attic or roof space.
- Use of Flashing: Be sure to install metal flashing at critical points such as chimneys, valleys, skylights, and vents. Flashing helps direct water away from these vulnerable areas, preventing leaks.
If you keep these tips in mind when installing roll roofing, it can help you get a longer service life and better performance out of your roll roofing roof.
About the Author
Jack Gray is a principal roof consultant and vice president at the Moriarty Corporation, an award-winning building enclosure consultant firm founded in 1967. He is also the editor of the Roof Online website.

Mr. Gray has worked in the roofing industry for over 25 years, with training and practical experience in roof installation, roof inspection, roof safety, roof condition assessment, construction estimating, roof design & specification, quality assurance, roof maintenance & repair, and roof asset management.
He was awarded the Registered Roof Observer (RRO) professional credential in 2009.
He also served as an infantry paratrooper in the 82nd Airborne Division and has a B.A. from Cornell University. Read full bio.