How to Repair an EPDM Rubber Roof • Step-by-Step Guide
By Jack Gray, Roof Online Editor • Last updated April 11, 2023
Also see our EPDM Roofing page.
Table of Contents
This guide provides step-by-step instructions on how to patch a rubber roof. You can repair an EPDM rubber roof yourself. EPDM rubber is one of the easiest roofing materials to repair properly.
Always follow roofing safety guidelines when working on a roof.
Important: You should never use asphalt products on an EPDM roof. EPDM is completely incompatible with solvent-based asphaltic roofing materials, such as asphalt-based roof coatings and roof cement.
It is extremely important that you follow the membrane cleaning instructions or your patch will fail.
What You Will Need to Repair an EPDM Rubber Roof
DIY EPDM Repair Kit: This is likely to be the easiest option, as these kits have everything you’ll need except for a caulk gun or scrub brush, and they have an appropriate amount of each material, so you don’t end up with a lot of something left over.
One or two holes: See this repair kit (yes, it will work on a roof).
For more extensive repairs: See this repair kit on Amazon.
–OR–
Tools
- Caulk Gun See on Amazon
- Cleaning Brush, Soft-Bristled See on Amazon
- Cleaning Rags
- Paint Brushes See on Amazon
- Scissors, Heavy-Duty See on Amazon
- Seam Roller, Hand-held See on Amazon
Materials
- EPDM Rubber Membrane, at least 0.060″ thick (60-mil) See on Amazon or minimum 6-inch wide Peel-and-Stick EPDM Cover Tape, Patching Tape, or Flashing Tape See on Amazon. DO NOT use double-sided Seam Tape. Fully-cured or semi-cured material is preferred over uncured material for long-lasting repairs.
- Lap Sealant See on Amazon
- Splice Adhesive See on Amazon
- Splice Primer See on Amazon
- Weathered Membrane Cleaner See on Best Materials
How to Repair an EPDM Rubber Roof
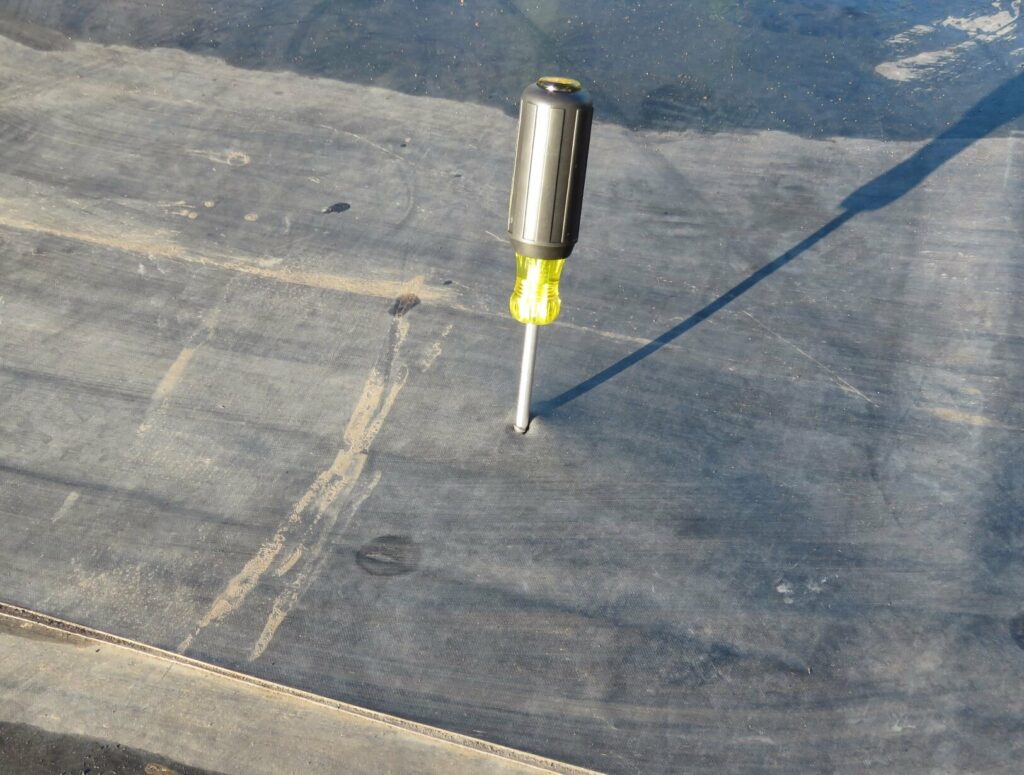
This is how to repair an EPDM rubber roof membrane puncture using a patch made of EPDM rubber or EPDM cover tape.
Prepare the Patch Material
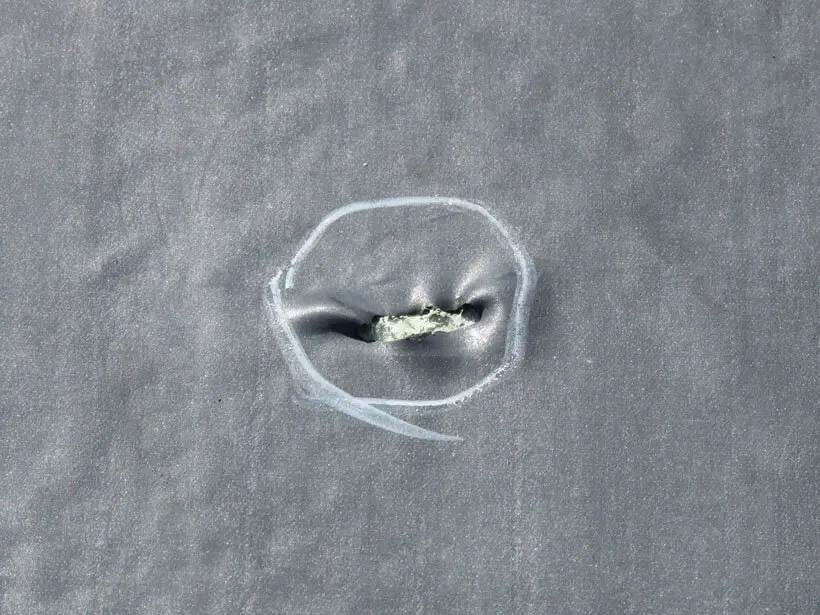
The repair must extend a minimum of 3 inches beyond the edge of the hole in all directions.
Cut an appropriate-sized piece of EPDM membrane or EPDM tape.
Round all corners of the repair piece with scissors or shears.
Note that even a pinhole will require a 6″ x 6″ patch.
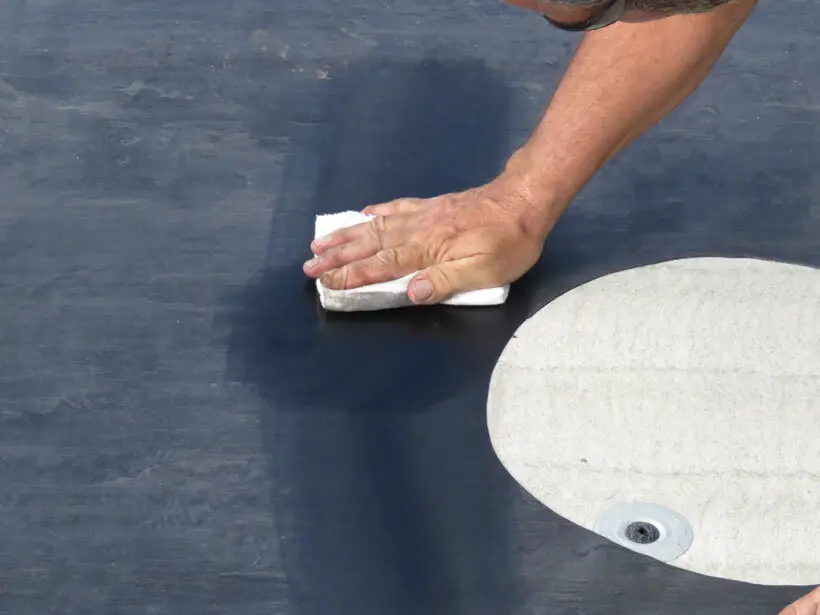
Clean the Membrane
When you repair an EPDM rubber roof membrane which has been in service for some time, it is absolutely vital that you remove the accumulated field dirt.
It is very common to see failed EPDM repairs, even when they were done by professional roofers, due to the old membrane not being cleaned or not being cleaned thoroughly enough.
Fine particles of carbon black continually migrate out of EPDM membranes as they age, so even a membrane that looks fairly clean will often have a layer of black soot-like material on its surface.
Proper membrane preparation is accomplished by first scrubbing the membrane with a soft-bristled scrub brush (do NOT use a brush with wire bristles) and warm soapy water, then rinsing with clear water.
Repeat this process until all of the dirt is gone, and then dry the area with a clean cotton rag.
Then clean the area again using weathered membrane cleaner. A second cleaning with weathered membrane cleaner is often necessary.
Apply EPDM splice primer to the clean area and allow it to dry.
Install the EPDM Patch
Note: If you are using a self-adhering peel-and-stick EPDM patch or tape to repair an EPDM rubber roof, you should not apply adhesive to the patch itself.
Prepare the Splice Adhesive and Apply it with a Brush:
Thoroughly stir the splice adhesive before and during use. Apply the splice adhesive using a 3-inch- or 4-inch-wide by 1/2-inch-thick solvent-resistant paint brush in a thick, even, smooth coat with long, painting-style strokes, so that the marks from the brush disappear, yielding a smooth, glossy adhesive surface.
Apply splice adhesive to both mating surfaces (on the roof and on the patch) at about the same time, so as to allow approximately the same drying time.
Do not use a circular motion to apply the splice adhesive. Do not use paint rollers or spray equipment to apply the splice adhesive!
Apply Extra Adhesive at Cross Seams:
If your patch intersects a field seam (where the installers joined two sheets) or a factory seam (where two pieces were joined at the factory to create a single manufactured sheet), make one short back stroke at each seam your patch crosses to apply extra adhesive at the step-off.
Test Splice Adhesive for Readiness:
Allow the splice adhesive to flash off. Touch the adhesive surface in the middle of the area to be patched to be certain that the adhesive does not come off and stick to your finger.
As you are touching the adhesive, push lightly straight down to check for stringing, and also push forward on the adhesive at an angle. If either motion exposes wet or stringy adhesive when you lift your finger, then it is not yet ready for mating and needs more time.
Flash-off time will vary depending on the temperature and humidity of the ambient air.
Set the Patch (Using Applied Adhesive):
Lightly position the patch over the prepared membrane area. Starting at one edge, allow the patch to fall slowly and loosely onto the area with a rolling motion, without stretching or wrinkling the patch.
Set the Patch (Using a Peel-and-Stick Patch):
Place the patch onto the prepared area. Firmly hold one edge of the patch in place with one hand. With the other hand, starting from the edge that you are holding, slowly pull off the release film/paper, allowing the patch to settle loosely onto the prepared area as you go.
Keep the patch as close to the roof membrane as you can to prevent wrinkling.
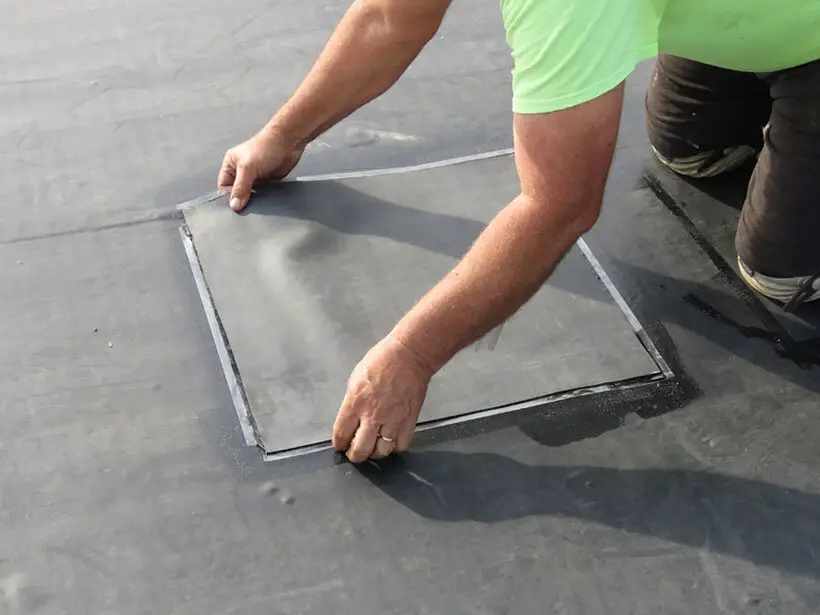
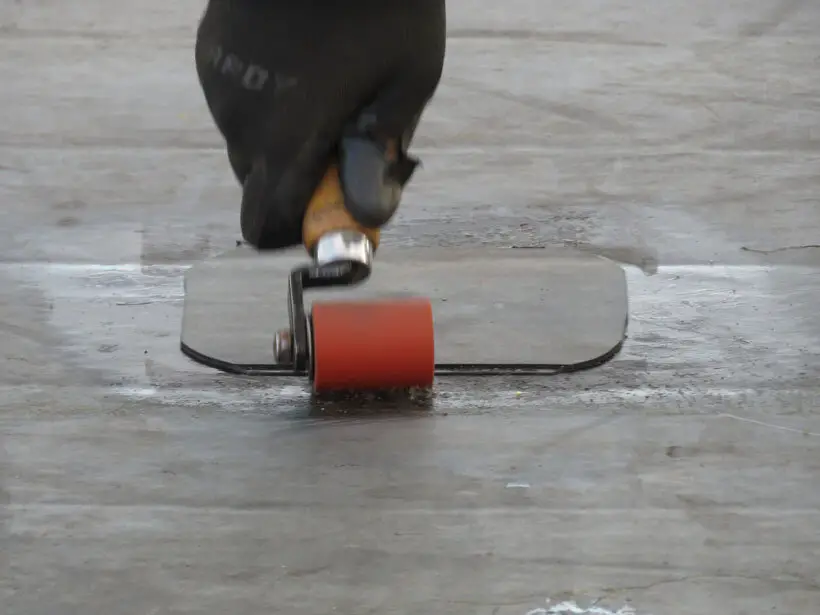
Apply Pressure and Roll the Patch:
Apply pressure along the entire area of the patch by hand to completely mate the two surfaces. Using a handheld seam roller, roll the entire patch with firm, heavy pressure going from the center of the patch toward the outside edges of the patch.
This will force any trapped air out from under the patch, ensuring a complete bond.
Wait Before Applying Lap Sealant:
Wait to apply lap sealant at least 4 hours after applying the patch, unless rain is coming. If rain is likely, the lap sealant must be applied before the rain starts.
If weather is not an issue, the lap sealant must be applied no later than the end of the following day. Try to make the repair on a day when rain is not in the forecast.
Clean the Edge of the Patch:
Clean the edges of the patch a minimum of 1 inch on each side of the edge itself using clean cotton rags and weathered membrane cleaner.
Apply splice primer to this area and allow to dry.
Apply Lap Sealant
Using a standard caulking gun, apply a thick, continuous bead of lap sealant around the entire patch, about 3/8-inch wide, centered on the exact edge of the patch. Smooth down the sides of the bead of lap sealant immediately, taking care to leave the sealant very thick directly over the lap edge.

End
That’s how you repair an EPDM rubber roof.
About the Author
Jack Gray is a principal roof consultant and vice president at the Moriarty Corporation, an award-winning building enclosure consultant firm founded in 1967. He is also the editor of the Roof Online website.

Mr. Gray has worked in the roofing industry for over 25 years, with training and practical experience in roof installation, roof inspection, roof safety, roof condition assessment, construction estimating, roof design & specification, quality assurance, roof maintenance & repair, and roof asset management.
He was awarded the Registered Roof Observer (RRO) professional credential in 2009.
He also served as an infantry paratrooper in the 82nd Airborne Division and has a B.A. from Cornell University. Read full bio.
Related Articles
Best Roof Repair Tape • Top 5 Roof Sealant Tapes
EPDM Roofing 101 • An EPDM Roof Guide for Non-Roofers
How Long Does a Roof Last? • Roof Lifespan for 49 Roof Types
How to Choose a Roofer • 8 Important Selection Criteria
How to Replace a Missing Asphalt Shingle
